What to keep with your camp stove so you’re not improvising during a freeze
Photo credit: Aleksey Matrenin/Shutterstock.com
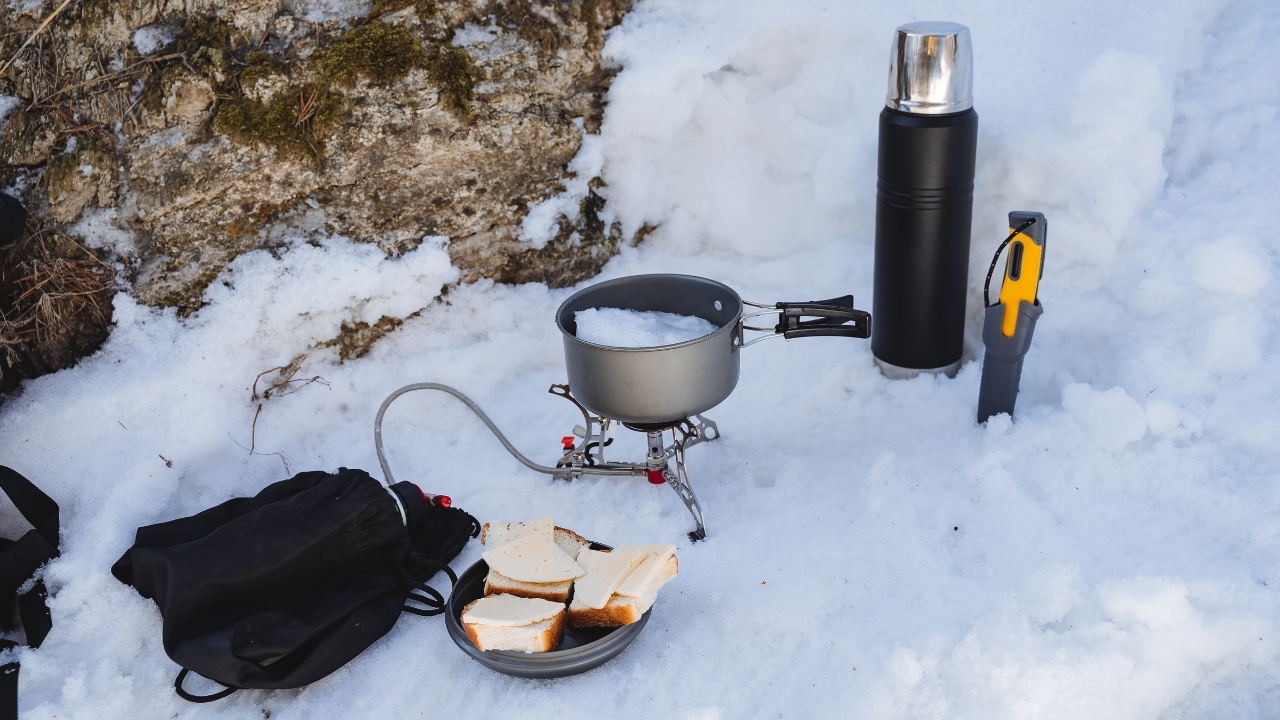
When the temperature drops, your camp stove quietly becomes survival gear instead of just a way to make coffee. If you already keep the right tools, fuel, and safety add‑ons packed with it, a sudden freeze is just an inconvenience instead of a scramble. The goal is simple: build a small, permanent kit around your stove so you can cook, melt snow, and stay warm without improvising with frozen fingers.
Think of it as a “stove system” that always lives together in one bag or box. You are not just tossing in a lighter and hoping for the best, you are pairing your burner with wind protection, stable bases, heat shields, repair tools, and food that actually works in the cold. Once you dial that in, you can grab one bundle on your way out the door and know you are covered for a hard freeze, whether you are winter camping on purpose or stuck out longer than planned.
1. Start with a winter capable stove and fuel pairing
Your whole plan falls apart if the stove and fuel you grab simply do not work in the cold. Canister stoves are light and convenient, but standard upright models lose pressure as temperatures drop, which is why experienced winter travelers often treat the stove, pot, and fuel as a single integrated system. Detailed winter lists for one or two people call out a dedicated Cook pot, a reliable burner, and enough fuel to melt snow and cook, instead of assuming summer gear will stretch into January.
If you do stick with canisters, it helps to choose models that can run in a liquid feed configuration, where the canister is inverted so the stove draws liquid fuel instead of vapor. That option is described as exclusive to remote canister designs that can be run on a liquid‑feed, which keeps them working better in deep cold. Some winter campers skip canisters entirely and move to white gas or similar liquid fuel once the forecast looks ugly, a shift echoed in a Comments Section discussion where cold weather regulars recommend liquid fuel when temperatures plunge.
2. Keep fuel warm and pressurized when temps crash
Even with the right stove, you still need to baby your fuel when the mercury dives. One simple trick is to use warm water to help the canister maintain pressure, which is exactly the idea behind a hack that tells you to Create a Warm Water Bath so the fuel can pressurize effectively. You do not need boiling water, just enough warmth in a shallow container to keep the canister from turning into a useless block of ice.
When you are not actively cooking, treat your canister or fuel bottle like a piece of clothing. Sleep with it in your bag, tuck it inside your jacket while you move around camp, and avoid leaving it sitting in the snow. Winter camping checklists that cover the full cold weather kit, from Stove and fuel to trash bags, assume you are already planning around freezing conditions, so build the habit now of keeping fuel off the ground and out of the wind instead of trying to thaw it with a lighter later.
3. Lock in stability with bases, mats, and wind protection
Snow, ice, and frozen duff are terrible foundations for a tiny burner and a full pot. A dedicated base plate spreads the load and keeps the stove from tipping or sinking, which is exactly what the Trillium Stove Base is built to do for liquid fuel stoves and the MSR WindPro. The Trillium Stove Base folds up small, but once it is deployed under your burner it gives you a wide, stable footprint that matters a lot more when you are cooking in gloves on uneven snow.
Underneath that, you want a heat resistant layer that protects your shelter or groundsheet from radiant heat and stray embers. A purpose built pad like a Fire Mat is Designed to be placed under a tent stove so it can shield the tent floor from the heat generated by the stove and prevent damage. Around the flame, wind protection is just as important, which is where a compact screen such as product specific windshields can help you hold a steady flame instead of wasting fuel in gusts.
4. Add clip on windshields so you are not cooking in a gale
Wind is the silent fuel thief in winter, stripping heat from your pot and forcing you to burn through canisters just to simmer noodles. A dedicated screen like The Korda Windshield gives your stove protection from inclement weather so you are always cooking or heating efficiently instead of fighting every gust. The Korda Windshield is designed to wrap around your burner and pot, which makes it a natural candidate to live permanently in your stove bag.
If you prefer something that clips directly to a canister, a hard anodized aluminum shield such as the Optimus Clip‑On Windshield is described as Lightweight and built to work with canister mounted stoves. That kind of shield Increases stove efficiency and substantially cuts boil times, which matters a lot more when you are trying to melt snow for water. A second listing for The Korda Windshield and a parallel entry for the Optimus Clip‑On Windshield both underline the same point, you want a compact, dedicated barrier that lives with your stove so you are never stuck building rock walls in a blizzard.
5. Pack the right pot, lid, and snow melting setup
In a freeze, your stove is also your tap, so your pot choice suddenly matters. Winter focused gear lists point out that Snow is typically 5 to 15 percent water by volume, which means that to get one liter of water it is necessary to melt 6.5 to 20 liters of snow, depending on conditions. That is a lot of scooping and simmering, so you want a pot that is big enough to handle real volume, has a tight lid, and pours cleanly into bottles without wasting precious hot water.
The actual melting process is easier if you follow a simple routine. Winter camping basics recommend that you Designate an area for gathering clean, white snow, then Light your stove and Put a little water in your pot before you add snow so you do not scorch it. That tiny bit of starter water helps the snow melt smoothly instead of turning into a burned slush layer on the bottom. Keeping a dedicated scoop or small bag with your stove kit for collecting snow means you are not sacrificing your only bowl or mug every time you need to refill.
6. Build a safe hot tent and chimney zone
If you are running a tent stove, your “keep with the stove” kit needs to include the parts that keep your shelter from catching fire. A hot tent guide spells out that When you are selecting your setup, you should look for a Fireproof Stove Jack that Ensures chimney safety and heat resistance where the pipe exits the fabric. It also stresses that you should always set up your tent with the stove in the center to distribute heat evenly, which is a good reminder to keep your jack, extra guy lines, and pipe sections stored right alongside the stove so you are not hunting for them in the dark.
Inside the tent, you want layers of protection between the stove and anything that can melt or burn. A dedicated Fire Mat is Designed to be placed under a tent stove to shield the floor from heat and stray embers, and hot tent accessory lists call out Heat Shields as Protecting Your Tent and Enhancing Safety when you are running a stove in Winter Camping conditions. When you are engaging in winter camping with a hot tent, those shields and mats let you enjoy the beauty of the winter wilderness without worrying that one coal will end the trip.
7. Fire management tools so the stove runs all night
Once the stove is lit, the next challenge is keeping it going through a long, cold night without constant babysitting. A set of Essential Tips for tent stoves starts with the fuel itself, telling you to Use Seasoned Firewood and Burn well seasoned hardwoods so you get long, steady heat instead of smoky flare ups. Banking the fire before bed, by piling coals and adding a larger log, helps it last longer, but you still need the right tools on hand to do that safely in a small space.
At minimum, keep a metal poker, small shovel, and heat resistant gloves stored with the stove so you can adjust the fire without melting your jacket sleeves. A compact multi tool is also worth its weight, and winter survival kits describe The Foundation of a Reliable Multi Tool by pointing out that Every survival kit starts with one truth, a good multi tool replaces half your toolbox. Toss in a small brush for ash, a spare lighter, and a few fire starters, and you will not be stuck trying to relight a cold stove with frozen kindling at three in the morning.
8. Food, hot drinks, and kitchen extras that actually work in a freeze
In the cold, your stove is only as useful as the food you can realistically cook on it. Winter camping kitchen lists highlight the need for a solid Camp kitchen with Shared items like Food that is high calorie, easy to cook, and simple to clean up, plus Hot drinks that keep morale up. That means leaning on freeze dried meals, instant noodles, couscous, and other options that cook fast and do not require long simmer times that burn through fuel.
It also means keeping the little extras with your stove instead of scattered around your pack. A winter checklist that covers everything from Jan trip planning to backup heat sources reminds you to pack insulated mugs, spoons that will not snap in the cold, and enough fuel to power through multiple rounds of tea or cocoa. Stash a small bottle of cooking oil, a windproof lighter, waterproof matches, and a compact cutting board in the same bag as your burner so you can drop the kit on a picnic table or snow bench and start cooking without a scavenger hunt.
9. Safety, repairs, and the “never improvise again” kit
The last piece of your stove bundle is the stuff you hope you never need but will be very glad to have when something goes sideways. A winter camping primer that covers everything from Snow Travel to Backpack choices and Daypack setups treats the stove and fuel as core safety gear, not luxuries. Pair that mindset with a broader winter camping guide that talks through the best winter tent, gear, and activities, and you will see reminders that if you are using jet burner stoves in the cold, you want models with a pressure regulator so that When it is really cold you can still cook so that it stays warm, a detail highlighted in a short guide to winter camping.
Round out your kit with a small repair pouch that lives in the same bag as the stove. Include spare O rings, a tiny wrench, duct tape, zip ties, and a few hose clamps for pipe sections, plus a compact first aid setup with Adhesive bandages, gauze, and tape in case someone brushes a hot pot. If you are running a hot tent, keep your Must Have Accessories for Hot Tent Stove like extra Heat Shields and spark arrestors in the same container. Once all of that lives together with your burner, you are no longer improvising during a freeze, you are just following a system you packed on purpose.
Like Fix It Homestead’s content? Be sure to follow us.
Here’s more from us:
- I made Joanna Gaines’s Friendsgiving casserole and here is what I would keep
- Pump Shotguns That Jam the Moment You Actually Need Them
- The First 5 Things Guests Notice About Your Living Room at Christmas
- What Caliber Works Best for Groundhogs, Armadillos, and Other Digging Pests?
- Rifles worth keeping by the back door on any rural property
*This article was developed with AI-powered tools and has been carefully reviewed by our editors.