The 10 photos that make an insurance claim go smoother (and what people never document)
Photo credit: Fizkes/istock.com
When you are staring at a wrecked car or a soaked living room, the photos you take in those first few minutes can decide how quickly your insurance claim gets paid and how much you recover. Insurers rely on visual proof to verify what happened, what was damaged, and what it will cost to fix, yet most people only snap a few hasty shots and hope for the best. With a deliberate checklist of ten specific images, you can turn your phone into a quiet advocate that makes adjusters’ jobs easier and your settlement smoother.
The right images are not glamorous, they are methodical: wide context, clear angles, timestamps, and the small details people almost never document. By treating your photos as evidence rather than souvenirs, you give yourself leverage in every conversation that follows, from the first call with your carrier to any dispute months later.
1. The wide “scene setter” shot most people skip
Your first instinct is usually to zoom in on the worst damage, but your first photo should actually zoom out. A wide “scene setter” frames the entire affected area so an adjuster can see where the damage sits in relation to everything around it, whether that is a crumpled bumper in the middle of an intersection or a collapsed ceiling over your dining table. Restoration specialists stress that you should take these images the moment you arrive, before you touch anything, because that untouched scene is the closest thing you have to a frozen moment in time.
Professionals recommend starting with wide shots first, then walking the perimeter and capturing the entire affected area from multiple angles so you can later show how far water spread, how big a fire zone was, or how vehicles ended up positioned. Standing in doorways or at the corners of a room helps you capture the whole space without needing any professional gear, and those context images often do more to speed up a claim settlement than a dozen close‑ups that lack a sense of place.
2. Eye‑level straight‑on views that match how adjusters see
Once you have the big picture, your next photos should match how a person would naturally look at the damage. That means standing at normal height and shooting straight on, not crouching into odd angles or tilting your phone. Insurers and contractors reviewing your file are trying to understand what it would feel like to stand where you stood, and eye‑level images make it easier to judge scale, severity, and whether something looks repairable or totaled.
Guidance for restoration crews emphasizes eye‑level straight‑on shots because they are easier to interpret than dramatic, skewed photos that distort lines and distances. You can still move closer or farther away, but keep the camera parallel to walls, doors, or vehicle panels so dents, cracks, and stains appear in their true proportions. When an adjuster compares your images with a repair estimate, these straightforward views help them see exactly what a body shop or contractor will be working with.
3. The “before, during, after” sequence that proves your loss
If you want a claim to move quickly, you need to show not just what is broken, but how it changed over time. That is where a simple three‑part sequence becomes powerful: photos from before the loss, images during the incident or immediately after, and documentation of the finished repairs. For property owners, that might mean keeping a home inventory album on your phone, then adding fresh shots after a storm or leak, and finally photographing the restored room once work is complete.
Restoration experts describe this as The Essential Photo Sequence of “Before, During, After,” and they consider it critical for every insurance restoration claim because it proves that the items you say were damaged actually existed and shows the scope of work required to fix them. Even if you do not have perfect “before” images, you can start building that library now by walking through each room and taking a slow set of reference photos, a step many guides recommend when they urge you to take digital photographs and video of each room long before anything goes wrong.
4. Close‑ups of damage, from dents to soaked drywall
After you have context and straight‑on views, you can finally move in close. These are the photos most people remember to take, but they often stop too soon, capturing only one angle or a single item. You should photograph every visible sign of damage, from chipped paint and shattered glass to warped floorboards and blistered siding, and you should do it from several distances so details remain clear even if someone zooms in later.
Auto claim specialists advise that you document Vehicle Damage with both close‑up and wide‑angle shots of all harm to your car and any other vehicles involved, because adjusters need to see scratches, crumples, and broken lights in the context of the whole body panel. The same logic applies at home: if a pipe bursts behind a wall, photograph the soaked drywall, the pipe itself if exposed, and any nearby belongings that got wet. Detailed images help support repair estimates and reduce back‑and‑forth requests for more proof.
5. Angles that map the entire accident or loss area
One of the most common gaps in claim files is a lack of coverage from different angles. You might have a perfect shot of your front bumper, but nothing that shows skid marks, traffic signals, or how far debris scattered. To avoid that, think like a surveyor and walk a slow circle around the scene, pausing every few steps to take another photo. For property losses, that might mean moving around a room or along the outside of a building to capture every wall, corner, and elevation.
Accident guides urge you to Get Accident Scene Photos from Every Angle so you can Capture a comprehensive view of the damage and surroundings, which helps reconstruct how a crash unfolded. Another checklist for collisions stresses What Pictures to Take at the Scene of a Car Accident, including Taking images of both cars and the entire crash scene, not just the worst dent. The same multi‑angle discipline helps with fires, storms, and vandalism, because it shows the full footprint of the loss.
6. The “people and paperwork” photos almost no one takes
Most policyholders focus entirely on physical damage and forget to document the human and administrative side of an incident. Yet photos of license plates, driver’s licenses, insurance cards, business cards from contractors, and even the responding officer’s badge number can save you hours of chasing information later. If anyone has visible injuries, they should consider photographing bruises, cuts, or medical devices once it is safe and appropriate, since those images can help connect treatment to the event.
Accident checklists for modern devices, including an Accident Photo Checklist tailored to 2026 Phones, highlight What to Capture So It is Actually Usable Later, including clear images of documents and contact details that you might otherwise misplace. Injury lawyers who remind clients that Your Photos Win Big Cases also point out that adrenaline can make you forget to gather this visual evidence in the moment, so building it into your personal checklist helps protect you when memory fades.
7. Everyday belongings and home inventory shots
Long before a pipe bursts or a wildfire threatens your neighborhood, you can take some of the most valuable photos you will ever use in a claim: images of your belongings when they are safe and intact. Walk room by room and photograph furniture, electronics, appliances, and anything else you would want replaced, then open closets and drawers to capture clothing, tools, and collections. These images help you prove ownership and approximate value if items are later stolen, destroyed, or damaged beyond repair.
Home insurance specialists suggest simple techniques, such as using a smartphone camera with flash and keeping your list updated, when you are photographing your belongings for insurance claims. Another guide on Taking proper documentation emphasizes that such Photographs should be backed up into cloud‑based storage so you do not lose them if your phone is damaged in the same event. When a claim handler asks what you owned, you will have more than memory to rely on.
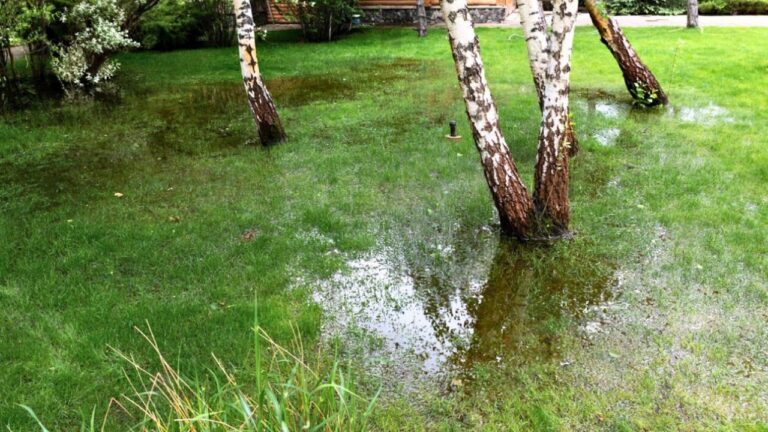
8. Timing, conditions, and the small context clues
Insurers do not just care about what is broken, they care about when and how it happened. That is why you should take photos as soon as it is safe, while skid marks are still visible, rain is still falling, or water is still pooling on the floor. Your phone’s metadata will record timestamps, but visible context like wet pavement, deployed airbags, or active sprinklers can help corroborate your account of the conditions at the time of loss.
Accident guides repeatedly urge you to Take photos of the accident as soon as possible, noting that There is a lot to handle at a crash scene and you may not remember every detail later. Another resource on how to Document every detail after a collision explains that early images can be crucial for legal or insurance reasons later on, especially when weather, lighting, or traffic patterns are in dispute. For property claims, similar logic applies to documenting storm clouds, fallen branches, or standing water before cleanup crews arrive.
9. The photos you think you do not need, until you do
Finally, some of the most useful images are the ones you are tempted to skip because they feel redundant or unimportant. That includes extra shots of the crash scene from a distance, photos of nearby traffic signs or speed limit postings, and images of seemingly minor scuffs or debris. It also includes documenting contributing factors like What Types of Photos to Take After a Car Accident, such as signs of Careless or Distracted driving, which can matter if liability is contested.
Legal and insurance professionals also remind you to follow basic best practices, such as the Tips for taking pictures after a crash in Connecticut that urge you to Take accurate photos of the scene as soon as possible, and broader Tips on taking pictures for auto insurance claims that encourage you to preserve original images to maintain their authenticity. When you combine those habits with the ten categories of photos above, you give your insurer a clear, credible record that can smooth nearly every step of the claims process.
Like Fix It Homestead’s content? Be sure to follow us.
Here’s more from us:
- I made Joanna Gaines’s Friendsgiving casserole and here is what I would keep
- Pump Shotguns That Jam the Moment You Actually Need Them
- The First 5 Things Guests Notice About Your Living Room at Christmas
- What Caliber Works Best for Groundhogs, Armadillos, and Other Digging Pests?
- Rifles worth keeping by the back door on any rural property
*This article was developed with AI-powered tools and has been carefully reviewed by our editors.