The siding gap that invites pests and moisture at the same time
The narrow space where your siding meets the foundation looks harmless, but it is often the single most efficient pathway for both pests and moisture into your home. When that joint is poorly detailed, you are effectively inviting rodents, insects, and water to the same entry point, which can quietly undermine your structure and your indoor air quality at the same time. Understanding how that gap works, and how to manage it without trapping water, is one of the most valuable upgrades you can make to your building envelope.
Why the siding–foundation gap matters more than you think
At the base of your exterior walls, the cladding is supposed to shed water while still allowing any trapped moisture to escape. That is why most siding systems are intentionally held slightly above the foundation, creating a visible gap that lets the wall dry out. When that space is oversized, uneven, or left unprotected, it stops being a controlled drainage opening and becomes a direct route for mice, insects, and humid air to reach the framing and rim joist, where damage is hardest to spot and most expensive to repair.
Professionals who focus on building performance routinely flag this transition as a weak point, because it is where multiple materials meet and move differently over time. One building science discussion of a poorly detailed rim joist describes how the joint between framing, sheathing, and masonry can become a highway for rodents if it is not carefully sealed and insulated, with one Expert Member noting that even a small opening can accommodate the squeeze of a determined animal. The same geometry that makes this area tricky for pests also makes it vulnerable to wind-driven rain and splashback, so the stakes are doubled if you ignore it.
The double threat: rodents and water using the same opening
Rodents and moisture exploit the same physics at the base of your walls. Mice only need a gap roughly the size of your little finger to slip inside, and they are drawn to the sheltered, shadowed space where siding overhangs the foundation. In one Dec discussion among homeowners, a user described mice entering through exactly this kind of opening between siding and concrete, underscoring how quickly a seemingly minor construction detail can turn into a recurring infestation. Once inside the rim area, rodents can chew insulation, wiring, and even vapor barriers, which then makes it easier for damp air to move into the house.
Water follows a similar path, just without the scratching sounds. When rain hits the lower edge of your cladding, any gap that is not properly flashed or drained can funnel liquid directly behind the siding. Exterior specialists point out that poor installation, especially at the bottom courses, is a common cause of hidden rot and mold, because it creates easy entry points for moisture that then gets trapped against the sheathing. The result is a single vulnerable joint that can simultaneously harbor pests and feed long term water damage.
Why you cannot just caulk everything shut
Your first instinct might be to run a bead of caulk along the entire bottom of the siding and call it a day. That approach is tempting, but it ignores how siding systems are designed to work. Cladding is not a waterproof tank, it is a rain screen that expects some water to get behind it and then drain back out. If you seal the bottom edge completely, you can trap that water inside the wall, where it will soak the sheathing and framing instead of drying to the exterior.
Experienced installers warn against sealing the lower edge for exactly this reason, noting that you do not ever want to close off the bottom of the siding in a way that prevents drainage, because it will trap moisture and cause the siding and framing to fail prematurely. That caution is echoed in building science discussions of rim joists, where contributors emphasize that any air sealing must be paired with a path for incidental water to escape, especially at complex joints like the rim and foundation. The challenge is to block pests and uncontrolled air without turning the wall into a sealed container that cannot dry.
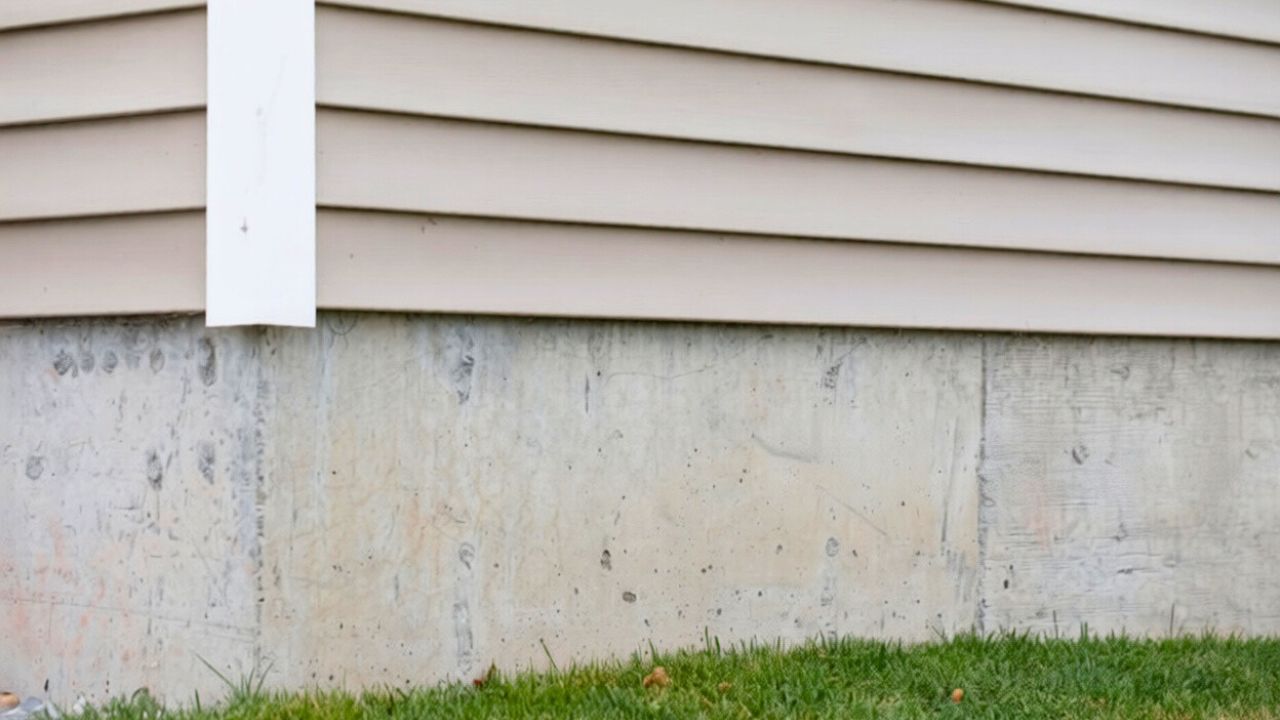
How gaps form where siding meets the foundation
The gap you see today at the base of your siding is rarely the same one that existed on day one. Materials expand and contract at different rates, foundations settle, and fasteners loosen, all of which can widen or distort the original spacing. A joint that was once a neat quarter inch can become a jagged opening large enough for a mouse or a steady trickle of water, especially where the siding transitions over steps, porches, or changes in grade.
Specialists in exterior maintenance note that gaps can form anywhere materials meet, including between the siding and the foundation, at roof corners, and around penetrations, and they stress that these openings are some of the most common routes for pests to get inside in the first place. One guide to gaps and pest entry points explains that these joints are especially vulnerable because they are hard to see and even harder to reach with standard repairs. Add in the wear from lawn equipment, splashback from downspouts, and freeze thaw cycles at the foundation line, and the lower edge of your siding becomes one of the most dynamic parts of the building envelope.
Spotting early signs of trouble behind the cladding
Because the siding–foundation joint is low to the ground, you might only notice a problem once it has already spread up the wall. To stay ahead of that curve, you need to look for subtle clues that water and pests are already using that opening. Discoloration along the bottom courses, peeling paint near the foundation, or a musty smell in the lower level can all signal that moisture is lingering behind the cladding. On vinyl, you might see panels that appear wavy or bulged where water has warped the substrate.
Exterior contractors who specialize in cladding problems point out that your siding does more than decorate your home, it protects the structure from the elements, and they highlight warping and buckling as key warning signs that something is wrong behind the surface. One detailed guide to common siding problems explains that distortion, staining, and soft spots near the bottom edge often indicate trapped moisture or rot in the sheathing. Another resource on water damage behind vinyl siding notes that poor installation at the base can allow water to infiltrate and stay hidden until you see mold, swelling, or insect activity higher up the wall, which is why regular visual checks along the foundation line are so important.
Moisture, mold, and the hidden cost of neglect
Once water finds a reliable path behind your siding, the damage rarely stays confined to the exterior. Persistent dampness at the base of the wall can wick into the rim joist and floor framing, where it feeds mold and slowly reduces the structural capacity of the wood. Over time, that can translate into spongy floors near exterior walls, musty odors in finished basements, and a higher risk of respiratory issues for anyone sensitive to mold spores.
Maintenance specialists warn that mold and mildew buildup on siding is often a symptom of deeper moisture problems, not just a cosmetic issue. A set of Common Siding Issues to address them notes that when you see organic growth or staining near the bottom of the wall, you should investigate for leaks or drainage failures before simply washing the surface. Another guide focused on Signs of Water explains that trapped moisture can lead to rot, insect infestations, and even compromised insulation, all of which add cost and complexity to any eventual repair. Ignoring that small gap at the foundation can therefore turn into a multi trade remediation project that affects everything from your energy bills to your indoor air quality.
How pests exploit the same weak spots
Rodents and insects are opportunists, and the lower edge of your siding offers exactly the kind of sheltered, narrow passage they prefer. Mice can run along the foundation, find a small crack where the siding lifts away, and then follow that channel up to the rim joist or into the basement. Once they establish a route, they leave scent trails that guide other animals to the same opening, which is why a single overlooked gap can support a recurring infestation even after you trap or bait the first wave.
Pest control experts routinely list the siding–foundation joint among the top ways mice get into a house, often illustrating the problem with images of exterior walls where the bottom edge of the cladding is visibly rotted or separated from the concrete blocks. One breakdown of 7 ways mice enter highlights how wear and water damage at this junction create perfect access points. Broader guidance on pest proofing homes also stresses the importance of sealing gaps around doors, thresholds, and other low level openings, recommending that you install door sweeps and use appropriate sealants to close cracks where light or air is visible, as outlined in one entomology resource that advises you to Install tight fitting barriers at entry points.
Smart ways to block pests without trapping water
The goal at the siding–foundation joint is not to eliminate the gap entirely, but to control it. You want to maintain a narrow, consistent opening that allows drainage and drying while denying access to rodents and insects. That usually means combining physical barriers with carefully chosen sealants, and focusing on the interior side of the joint or the plane of the sheathing rather than smearing caulk along the visible bottom edge of the siding.
Building science experts discussing rim joist problems often recommend insulating and air sealing from the inside with rigid foam and sealant, which blocks air and pest movement while still letting the exterior cladding drain. In one Solving Problem exchange, the suggestion is to use spray foam or similar products to close interior gaps that a rodent could squeeze through, rather than clogging the exterior drainage path. Exterior focused pest proofing advice similarly encourages you to seal cracks where materials meet, but to do so with flexible products that can handle movement and weather, and to pair those seals with proper grading and drainage so water is directed away from the foundation instead of pooling at the base of the wall.
Choosing the right sealants and weatherstripping for the job
When you are ready to tighten up the siding–foundation joint, the products you choose matter as much as where you apply them. For joints that need to flex with temperature swings and building movement, a high performance exterior caulk is essential. One example is a line of advanced exterior sealants marketed for windows, doors, siding, and trim, such as DYNAFLEX ULTRA, which is described as using WEATHER MAX technology for long lasting flexibility and adhesion. Using a product in that category at the sheathing or trim level, rather than at the bottom lip of the siding, can help you close air and pest gaps while preserving the drainage plane.
For irregular openings or penetrations where rodents are a concern, expanding foam sealants designed specifically to deter pests can be useful. Products like GREAT STUFF PRO pestblock insulating foam are marketed to block insects and rodents by sealing gaps, cracks, and holes where they commonly enter. For more linear joints or uneven surfaces, compressible weatherstripping can bridge the space without fully sealing it; for example, an M-D PLATINUM Expandable Foam Weatherseal is described as protecting against drafts, moisture, dust, and insects and being Perfect for uneven and oddly shaped gaps. Used thoughtfully, these materials let you fine tune the joint so it is tight enough to keep pests out but still open enough to let the wall dry.
Building a maintenance routine that keeps the gap under control
Even the best detailing at the siding–foundation joint will not last forever if you ignore it. You need a simple, repeatable routine that keeps this vulnerable area on your radar. That starts with a seasonal walk around the house, looking closely at the bottom courses of siding, the exposed foundation, and any transitions near steps, decks, or hose bibs. You are checking for new gaps, signs of gnawing, staining, or soft spots, and you are confirming that soil and mulch are not creeping up to bury the drainage gap.
Exterior maintenance guides emphasize that regular inspections and prompt repairs are the most effective way to stop minor siding issues from escalating into major structural problems. One set of siding maintenance tips advises homeowners to address small cracks, loose panels, and early signs of mold quickly to prevent further damage. Another resource on how to spot siding problems underscores that catching warping or buckling near the base early can save you from full wall replacements later. As you refine your routine, you can also upgrade specific components, such as replacing aging caulk with newer formulations like ULTRA WEATHER MAX sealants, refreshing pest specific foams like PRO pestblock, or adding additional Expandable Foam Weatherseal where movement has opened new gaps. By treating the siding–foundation joint as a living part of your home’s defense system rather than a static line of caulk, you give yourself the best chance of keeping both pests and moisture on the outside where they belong.
Like Fix It Homestead’s content? Be sure to follow us.
Here’s more from us:
- I made Joanna Gaines’s Friendsgiving casserole and here is what I would keep
- Pump Shotguns That Jam the Moment You Actually Need Them
- The First 5 Things Guests Notice About Your Living Room at Christmas
- What Caliber Works Best for Groundhogs, Armadillos, and Other Digging Pests?
- Rifles worth keeping by the back door on any rural property
*This article was developed with AI-powered tools and has been carefully reviewed by our editors.