What to document before repairs so insurance can’t deny the claim
When a storm, fire, or burst pipe tears through your home, the first instinct is to fix what you can. For your insurer, though, the priority is proof. If you repair or throw things away before building that proof, you hand the company an easy excuse to dispute what was damaged, how badly, and what it cost. The way you document those losses in the hours and days before repairs start often decides whether your claim is paid in full, chipped down, or denied outright.
To keep control of that decision, you need a clear record of the scene, your belongings, and your costs, assembled methodically before hammers swing or debris is hauled away. That means treating your home like a case file, not a cleanup site, until you have the photos, lists, and paperwork that make your version of events difficult to challenge.
Secure the scene, then capture the big picture
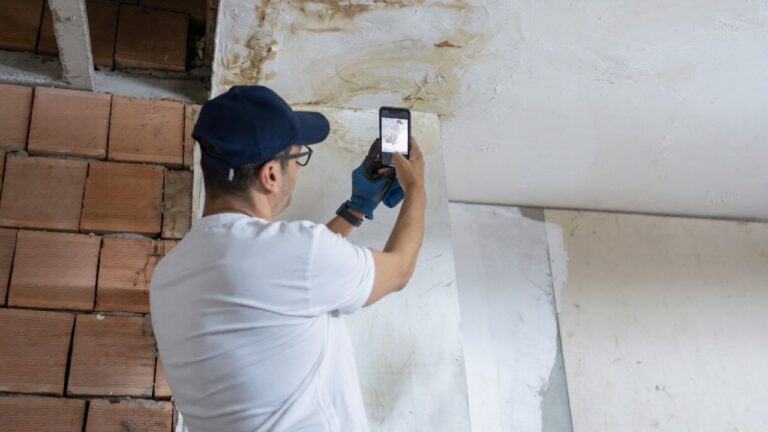
Your first job is safety, not snapshots. Guidance on Step Two of disaster response stresses that you should Carefully Document Your only after it is safe to enter, and that you must check for structural damage Before going inside at all. Similar advice for wildfire losses tells you to wait until emergency crews say it is safe and only then move on to documentation, with clear instructions on what to do After a blaze. Once you know the structure is sound, you can start building the visual record that will anchor your claim.
Insurers and restoration specialists consistently recommend starting with wide, context-setting images before you zoom in. One disaster guide’s Documentation Checklist begins with Step instructions to Contact Your Insurance and then take Take Wide views, including Angle Overview Photos. Claims professionals echo that wide shots are what Adjusters use to see the location and extent of the loss, and that They are not judging your artistry so much as whether they can understand what happened.
Photograph every angle before you touch anything
Once you have the big-picture images, you need a systematic sweep of the details. Legal guides on how to How to Document Property Damage a Successful Insurance Claim stress that Step one is to Take Photos from Every Angle as soon as it is safe. That means multiple shots of the same wall, floor, or appliance from different distances and perspectives, so an adjuster can see both the specific crack or stain and how it fits into the room. After a Wildfire, for example, you are advised to Photograph all affected structures and contents, including make, model, color, and size, so there is no ambiguity about what was lost.
Quality matters as much as quantity. A breakdown of Common Photo Mistakes warns that Taking Blurry or Unclear Photos is simply Bad evidence, because it forces the insurer to guess at what they are seeing. A practical rule of thumb circulating among adjusters and repair professionals is summed up in a social media reminder to Take pictures of all damage before you touch it, a kind of photographic CYA that starts with the mantra to Always document and to Don’t assume anyone will take your word for it later.
Build a paper trail: inventories, policies, and ownership
Photos show what is broken, but paperwork proves what it is worth. Consumer guidance on Dealing with Your Insurance Adjuster urges you to prepare detailed lists of all damaged property, including descriptions, ages, and estimated values, before Your adjuster arrives. A separate checklist for home claims starts with Policy Information, instructing you to Gather your declarations page, Required policy number, and coverage details for each Policy, and to Provid that information promptly when you file. Having those documents in hand before repairs begin lets you tailor your inventory to what is actually covered.
Ownership proof is another frequent flashpoint. Attorneys who help people How to Document Property Damage warn that insurers often demand receipts, serial numbers, or other proof that you actually owned high-value items, and they frame that advice as part of a broader Free Case Evaluation service. Video explainers from County Office walk through the same logic, encouraging you to gather purchase records and public documents that tie specific assets to your name. The more of that paper trail you assemble before anything is repaired or discarded, the harder it is for the insurer to argue that a missing television or tool set was never there.
Document your own repairs and mitigation efforts
Insurers expect you to prevent further damage, but they also expect proof that you did so reasonably. Guidance on Temporary and Minor stresses that you should Always contact your insurer before proceeding and that you must take photos and keep receipts Before you patch a roof or rip out wet drywall. Another legal checklist on how to make your claim difficult to deny opens with the reminder that Here you must Gather documentation right after the loss and show that you mitigated further harm, not just that you suffered the initial blow.
That same logic applies to specialized claims. For an equipment breakdown, for example, one step-by-step guide lists Step 1 as Gather Necessary Documentation, including service records and any temporary fixes you paid for. Home-claim checklists likewise tell you to keep receipts for stopgap work and to log All communications with the adjuster, so there is a written record that you sought approval. When you combine that with the earlier Documentation Checklist that urges you to keep records of every email and call, you end up with a timeline that shows you acted promptly and transparently, which is exactly what insurers look for when deciding whether to reimburse your repair costs.
Anticipate disputes: denials, exclusions, and extra evidence
Even with careful documentation, some claims run into pushback, often around policy exclusions or alleged gaps in proof. Overviews of Common Reasons for highlight that companies frequently point to fine-print limits on certain types of damage or argue that the evidence does not support the amount you are seeking. When that happens, you are advised to Gather Additional Evidence, compiling every photo, invoice, and expert opinion you can to counter the insurer’s narrative. A separate legal guide on challenging denials frames this as a second wave of documentation that builds on the photos and lists you created before repairs, rather than a scramble to recreate the scene after it has been cleaned up.
That is why specialists in disaster recovery emphasize Detailed Damage Photography and comprehensive coverage of both structural and content losses. They have seen firsthand the financial hardship that results when damage is not properly documented and claims are reduced or denied. Video explainers on Evaluation of property damage walk viewers through the same logic, showing how methodical documentation makes it easier to negotiate or appeal. When you combine that with the structured approach to What Insurance Adjusters and the early steps to Take Photos from every angle, you end up with a file that can withstand scrutiny even if the first answer from the insurer is no.
Like Fix It Homestead’s content? Be sure to follow us.
Here’s more from us:
- I made Joanna Gaines’s Friendsgiving casserole and here is what I would keep
- Pump Shotguns That Jam the Moment You Actually Need Them
- The First 5 Things Guests Notice About Your Living Room at Christmas
- What Caliber Works Best for Groundhogs, Armadillos, and Other Digging Pests?
- Rifles worth keeping by the back door on any rural property
*This article was developed with AI-powered tools and has been carefully reviewed by our editors.