HGTV’s “before and after” trick that makes rooms look bigger than they are
Photo credit: Hikesterson/istock.com
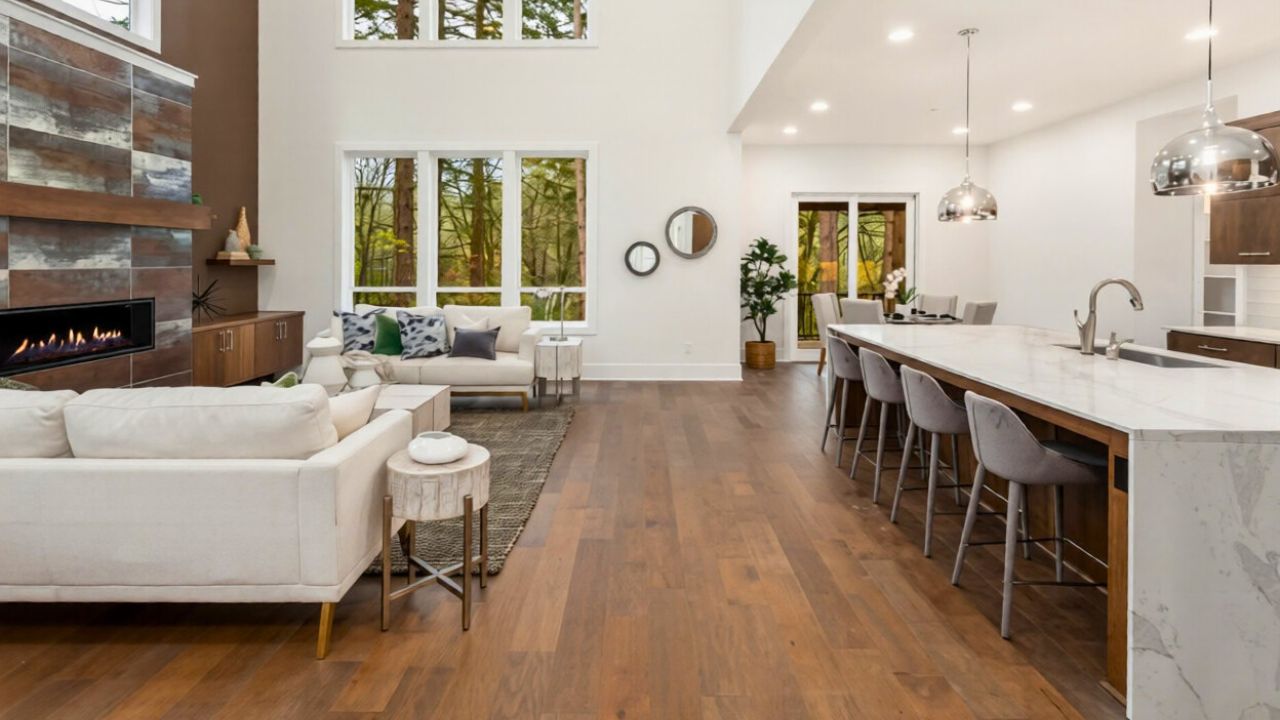
You watch a reveal on HGTV and the finished room feels airy, generous and effortlessly livable, even when the floor plan is barely larger than your own. The secret is not only new furniture or fresh paint, but a set of visual tricks that stretch the space on camera and in person. Once you understand how those “before and after” shots are engineered, you can borrow the same moves to make your own rooms read larger, whether you are staging to sell or simply tired of feeling cramped.
The HGTV illusion: why those after shots feel so big
When you see a cramped “before” and a spacious “after,” you are really seeing two different stories about the same square footage. In the first, clutter, heavy drapes and low, scattered furniture break the room into choppy pieces, so your eye stops every few feet. In the second, the staging team clears sightlines, raises visual height and chooses a camera position that lets you read the full width and depth at once, so you mentally upgrade the size. You experience volume, not just measurements, and that is the core of the HGTV illusion.
Professional stagers often start by stripping the room of distractions, then rebuilding it with a handful of large, simple pieces that guide your gaze from entry to far wall. On HGTV-style projects, you frequently see them remove personal items, pare back window treatments and rehang art so the walls feel intentional rather than busy. Guidance on how to stage a living stresses that when you edit down accessories and arrange furniture to open pathways, the same room immediately photographs as wider and more open.
How cameras cheat the room size
On television, the camera is your stand-in, and a skilled crew uses it to flatter the architecture. One of the most reliable tricks is to show three walls in a single shot so your brain can decode the full footprint. Real estate photographers describe this as the Feb, Three, Wall Framing Rule, a guideline that encourages you to frame from a corner so viewers see the size, shape and layout in one glance. When you follow that rule with your phone or DSLR, you give anyone scrolling a listing or watching a tour the same generous read of the space that you see on HGTV.
Lens choice does just as much work as composition. A wide angle lens lets you capture more of the room from a tight doorway, which is why property video specialists recommend that you Use a wider field of view whenever you are filming interiors. One production company explains that when you make a room, you rely on a wide lens, careful camera height and steady movement so viewers feel like they can step into the scene rather than peering through a keyhole.
Wide lenses, corners and the fine line between helpful and misleading
When you shoot your own home, you can borrow the same tools, but you also need to know where to stop. A modest wide angle can give a small bedroom some breathing room, yet an ultra wide lens can stretch walls into funhouse proportions and leave buyers feeling tricked when they arrive. Photography guides on small spaces point out that a wide angle lens can make a room look bigger in photos, but if you push the focal length too far, it can distort the image and warp straight lines at the edges. That distortion is the difference between an honest enhancement and a listing that feels like a bait and switch.
Your position in the room matters as much as the glass on your camera. Creators who specialize in real estate content often advise you to work from the corners so you can show as much of the space as possible without forcing it. One Instagram reel about small rooms explains that Using wider lenses and working from the corners helps show the full layout and totally opens up the room for viewers. When you combine that corner vantage point with a moderate wide angle, you get the HGTV-style sense of openness while still representing the size accurately.
Staging like a TV crew: furniture, flow and wall strategy
Before any camera comes out, HGTV designers behave like editors with a red pen. You can follow the same logic by asking what you can remove rather than what you can add. Oversized sectionals, extra side tables and low bookcases all eat into floor area and make the “before” feel heavy. Staging advice for living rooms recommends that you Don crowd the walls with furniture and personal items, but instead Leave Walls Blank in places so the eye can rest. When you Hang art thoughtfully at eye level and choose a few larger pieces instead of a grid of small frames, you get a calmer backdrop that reads as more expansive on screen and in person.
Flow is the other half of the illusion. If you can walk into a room and move directly toward a focal point, such as a fireplace or window, the space feels intuitive and generous. HGTV staging tips suggest that you float a sofa away from the wall to define a conversation area, angle chairs to open pathways and remove or pare down window treatments so more glass is visible. When you stage a living space with these moves, you naturally create longer sightlines, which a camera can then exaggerate into that familiar “after” feeling.
Color, continuity and the “one room into the next” effect
You may not notice it consciously when you watch a renovation series, but color is one of the quietest ways those shows stretch a floor plan. Designers often run a single wall color through adjoining rooms or choose neighboring shades with nearly identical undertones. That continuity erases visual boundaries so your eye glides from one area to the next instead of stopping at every doorway. A set of Simple Home Staging Tips for sellers spells this out clearly: to make a room appear larger, you use one color on the walls and trim for a seamless and sophisticated look that makes the envelope feel like a single volume.
The same strategy works in a compact home or apartment. If your living room opens into a hallway and kitchen, painting all three in a related palette and keeping flooring consistent will make the combined space feel like one larger zone. Designers on shows like Designed to Sell also rely on low contrast between wall color and big pieces of furniture so nothing chops the room into blocks. When your sofa, rug and walls are all within a tight color range, the edges blur and the footprint appears to grow, especially once it is photographed for a listing or social post.
Light, windows and the power of reflection
Television crews rarely accept the light they find in a house. They flood rooms with soft, even illumination that mimics daylight, then position the camera so windows glow rather than blow out. At home, you can get a similar effect by clearing anything that blocks natural light and supplementing with lamps that bounce brightness off ceilings and walls. Staging guidance for living rooms encourages you to remove or pare down window coverings to make the space look wider, which works because more visible glass extends the perceived boundary of the room.
Reflection multiplies that effect. Interior design advice on small spaces notes that Mirrors are one of the easiest and most effective ways to create the illusion of space because they reflect light and views. A Facebook post aimed at small space decorators explains that Mirrors give the illusion of more space by reflecting light and the view from across the room, and that placing them near doorways or behind furniture creates a bright space that feels larger. When you combine clear windows, layered lighting and well positioned reflective surfaces, you give any camera the raw material it needs to produce that signature HGTV glow.
Bathrooms and other tight spaces: borrowing social media tricks
The smallest rooms in your home benefit most from television style sleight of hand, and social media creators have become surprisingly sophisticated at copying those moves. One TikTok tutorial on compact baths opens with the question “do you want to make your bathroom look bigger than it really is” and then walks through five tips that transformed a dated, cramped space. The creator, torerageorge, explains that this is what their bathroom looked like before, then shows how swapping a busy shower curtain for clear glass, using larger format tile and adding bright, even lighting made the same footprint feel almost double in size. When you apply those lessons, you are essentially staging your bathroom the way a production designer would.
Another Instagram reel from a home renovator begins with the phrase “Your home should be your sanctuary” and then focuses again on bathrooms. The host says “Um I do this anytime I do a bathroom. I always do that. It adds it makes your bathroom look bigger” while demonstrating how raising the shower curtain closer to the ceiling and choosing a longer curtain panel elongates the walls. Over the clip, the creator explains that if you get about a ninety inch curtain and hang it higher, the ceiling feels taller and the room reads larger than what it is. When you combine those vertical tricks with the reflective power of tile and mirrors, even a narrow bath can photograph like an HGTV spa.
Phone-first photography: turning your listing into a mini reveal
You do not need a full camera crew to pull off a convincing “after” shot. With some care, your phone can capture listing photos that feel professional and fair. Guides to mobile real estate photography suggest that you start by cleaning and staging, then pay close attention to framing. When you follow the Feb, Three, Wall Framing Rule from one iPhone tutorial, you position yourself so three walls are visible, which instantly communicates the size, shape and layout of the room. The same guide recommends that you keep vertical lines straight by holding the phone level and avoid tilting up or down, since extreme angles can make ceilings or floors dominate the frame.
Lighting and timing matter just as much as composition. Real estate photography tips from storage and moving specialists advise you not to rely on harsh overhead fixtures, but to turn on all lamps, open blinds and shoot when natural light is soft. They also warn you not to Forget to Stage Your Home, because Before taking photos, it is important to set the scene so buyers can imagine themselves in the space. When you combine careful staging, straight verticals and thoughtful timing, the photos on your listing or Airbnb page begin to look less like quick snapshots and more like the polished reveals you see on HGTV.
Ethics of stretching the truth: where to draw your own line
HGTV and real estate content creators share a goal: they want you to feel excited about a space. The risk is that in chasing that reaction, you may be tempted to cross from flattering into deceptive. Ultra wide lenses can be incredibly useful tools in real estate photography, especially when documenting large commercial spaces or entire open plan areas, but specialists caution that you should use them to show true size rather than distort it. One photography service explains how to avoid over exaggerating spaces with an Ultra wide lens by keeping the camera at a natural height and including reference objects, such as furniture, so viewers can gauge scale accurately.
Like Fix It Homestead’s content? Be sure to follow us.
Here’s more from us:
- I made Joanna Gaines’s Friendsgiving casserole and here is what I would keep
- Pump Shotguns That Jam the Moment You Actually Need Them
- The First 5 Things Guests Notice About Your Living Room at Christmas
- What Caliber Works Best for Groundhogs, Armadillos, and Other Digging Pests?
- Rifles worth keeping by the back door on any rural property
*This article was developed with AI-powered tools and has been carefully reviewed by our editors.