Inspectors keep finding this moisture problem behind finished walls
Home inspectors keep flagging the same hidden defect inside otherwise polished houses: moisture trapped behind finished walls. You see fresh paint, new trim, maybe even a recent renovation, but behind the drywall or paneling, water is quietly rotting framing, feeding mold and undermining the structure you rely on.
If you understand how that concealed dampness starts, how professionals track it down and what you can do to prevent it, you are far less likely to inherit a costly repair after move in. The problem is common, but it is not inevitable if you know where to look and how to respond when an inspection report raises the alarm.
Why hidden wall moisture keeps surprising buyers
Part of the reason this problem shows up so often is that a standard home inspection is largely visual, and finished walls are designed to hide what is going on inside them. As one guide to inspection limits puts it, anything that cannot be seen by the naked eye usually is not reviewed, which means your inspector is not cutting open drywall or pulling off tile just to check for damp studs. That limitation gives slow leaks and condensation plenty of time to work in secret, especially in bathrooms, basements and exterior walls that see big swings in temperature and humidity.
At the same time, water intrusion is one of the most common and consequential defects in a house, because it leads directly to mold, rot and structural damage. Inspectors are trained to look for water damage on ceilings, walls and floors, but by the time stains or bubbling paint appear, the moisture inside the wall cavity may have been there for months. That is why you so often see inspection reports that mention “elevated moisture” in an area that looks fine to you during a walkthrough.
How moisture actually gets behind finished walls
To protect yourself, you need a clear picture of how water ends up behind drywall in the first place. Building science manuals on moisture intrusion stress that you should understand how water moves through a structure, including bulk leaks, vapor diffusion and capillary action, before you can reliably inspect for it, which is why professional courses on how to inspect for moisture start with physics, not gadgets. In practice, that theory translates into a few repeat offenders: roof or flashing leaks that run down inside exterior walls, plumbing lines that drip inside stud bays, and groundwater that wicks through foundation walls into finished basements.
There is also a quieter source that catches many owners off guard, which is condensation. When warm, moist indoor air hits a cold surface, such as an exterior wall in winter or an air conditioned wall in a humid climate, water can condense inside the cavity. Guides on dampness in walls explain that when warm, moist air comes into contact with a cooler surface, the moisture in the air condenses into liquid water, and that poor ventilation and intermittent heating all contribute to this kind of condensation. Add in penetrating dampness, where water seeping through walls leads to what those same guides call “penetrating dampness,” and you have a recipe for chronic moisture that never quite dries out.
The telltale signs you can spot before the inspector
Even though the worst of the damage happens out of sight, your senses can still give you an early warning if you know what to pay attention to. One of the most reliable red flags is smell: if you notice a persistent earthy or musty odor in a room, especially near an exterior wall or in a basement, that is often the scent of mold feeding on damp materials. Consumer advice on hidden water issues notes that musty smells indicating are your nose telling you there may be a mess of hidden water issues behind the surface, and that “sniffing” around odd smells is not just your imagination.
Visually, you should watch for subtle clues like small patches of discoloration, peeling or bubbling paint, hairline cracks that follow a water path, or baseboards that look swollen or separated from the wall. In basements, white, powdery deposits on concrete, known as efflorescence, are another strong indicator that moisture is moving through the wall, since one inspection guide explains that the efflorescence signals those white mineral deposits and is evidence of ongoing moisture intrusion. If you see any combination of these signs, you should assume there is more going on inside the wall than the surface suggests and plan to dig deeper during due diligence.
Why inspectors lean on meters and infrared instead of guesswork
Because finished walls hide so much, modern inspectors increasingly rely on instruments to test their suspicions without tearing anything apart. A common tool is the pinless moisture meter, which can detect moisture within and behind walls without breaking the wall’s surface material, allowing you to scan large areas quickly for anomalies. Manufacturers explain that moisture within and behind drywall can be picked up this way, and that this non destructive approach is ideal for finished spaces where you do not want to leave probe holes everywhere.
Infrared cameras add another layer of insight by translating temperature differences into color images that reveal patterns your eyes cannot see. Training materials on thermal imaging note that thermal patterns created by latent moisture become readily apparent when viewed through an IR camera, even when they are not visible to the naked eye, especially in hard to reach areas such as behind toilets. Separate guidance on using these cameras to inspect for moisture intrusion reinforces that IR cameras can highlight cooler, damp areas long before staining appears, which is why you increasingly see them in inspectors’ tool bags.
What “elevated moisture” in a report really means
When you read “elevated moisture” in an inspection report, it is easy to panic, but the phrase covers a range of situations. In stucco and exterior wall evaluations, professionals often treat moisture readings like a traffic light system for your walls, with a green zone around 8 to 15 percent representing normal moisture levels for many materials, and higher readings moving into caution and danger zones. One exterior specialist explains that you should think of moisture readings this way because it helps you interpret whether a number is simply a bit high due to recent weather or a sign of a leak that might otherwise remain hidden.
Context matters just as much as the raw number. If a meter shows a spike around a shower, a toilet or a kitchen sink, it may point to what one inspection advisory describes as leaking pipes and connections, old or damaged shower fixtures, or improper drainage that can all contribute to high moisture readings and water damage. In basements, a cluster of high readings along a foundation wall, combined with efflorescence, suggests groundwater intrusion rather than a one time spill. When a building inspection report shared in a homebuyer group noted elevated moisture found in a wall during construction, the commenter pointed out that it is not one of the most common snagging issues, but when it does happen it is often in places you would never think to check, like inside a wardrobe, which is why it is not something you should shrug off.
Common culprits inspectors keep tracing the moisture back to
Once an inspector confirms that a wall is damp, the next step is to figure out why, and the same suspects show up again and again. Plumbing is high on that list, particularly around bathrooms where toilets, tubs and showers all penetrate the floor and walls. In one plumbing discussion, a contractor using the handle Plumbdad09 advised a buyer to check between the flange and tile after an inspector noted elevated moisture levels, explaining that he had chased several leaks where the wax ring under the toilet had failed and allowed water to seep into the subfloor and wall cavity without any obvious surface puddle.
Basements and lower level walls are another frequent source, especially in older homes or properties with poor grading. A homeowner on an inspection forum described how they had insulation and baseboards replaced, drywall replaced and painted after discovering moisture, and concluded that neighboring yards that drain onto their property were part of the problem. Professional basement specialists warn that structural decay accelerates when moisture persists and that water intrusion threatens your home’s foundation, so chronic dampness in these areas is not just a cosmetic issue. Add in roof leaks that run down inside walls and exterior cladding failures, such as poorly detailed stucco, and you have a short list of repeat offenders that inspectors learn to investigate first.
How pros decide what to open up and what to monitor
When an inspection uncovers damp walls, the next question is whether to start cutting or to monitor and investigate further. Experienced inspectors and consultants emphasize that you should detect moisture issues before they escalate, using a combination of visual clues, meters and sometimes structural engineering input to decide on the right level of intervention. One engineering firm notes that you can detect moisture issues before they escalate by combining targeted testing with an understanding of how water moves through the building, which helps you avoid both unnecessary demolition and wishful thinking.
Damage free testing is a key part of that strategy. Guidance framed as Frequently Asked Questions explains that you can often detect moisture by using non invasive meters and by looking for secondary signs such as mold growth or peeling finishes, which can signal moisture buildup. Another resource titled Here reinforces that you do not have to punch holes in every suspicious wall to get useful data. If readings are only slightly elevated and there are no visible signs of damage, a consultant might recommend monitoring and improving ventilation first. If readings are high, odors are strong or finishes are failing, they are more likely to recommend opening the wall to see exactly what is going on.
What you should do when an inspection flags a wet wall
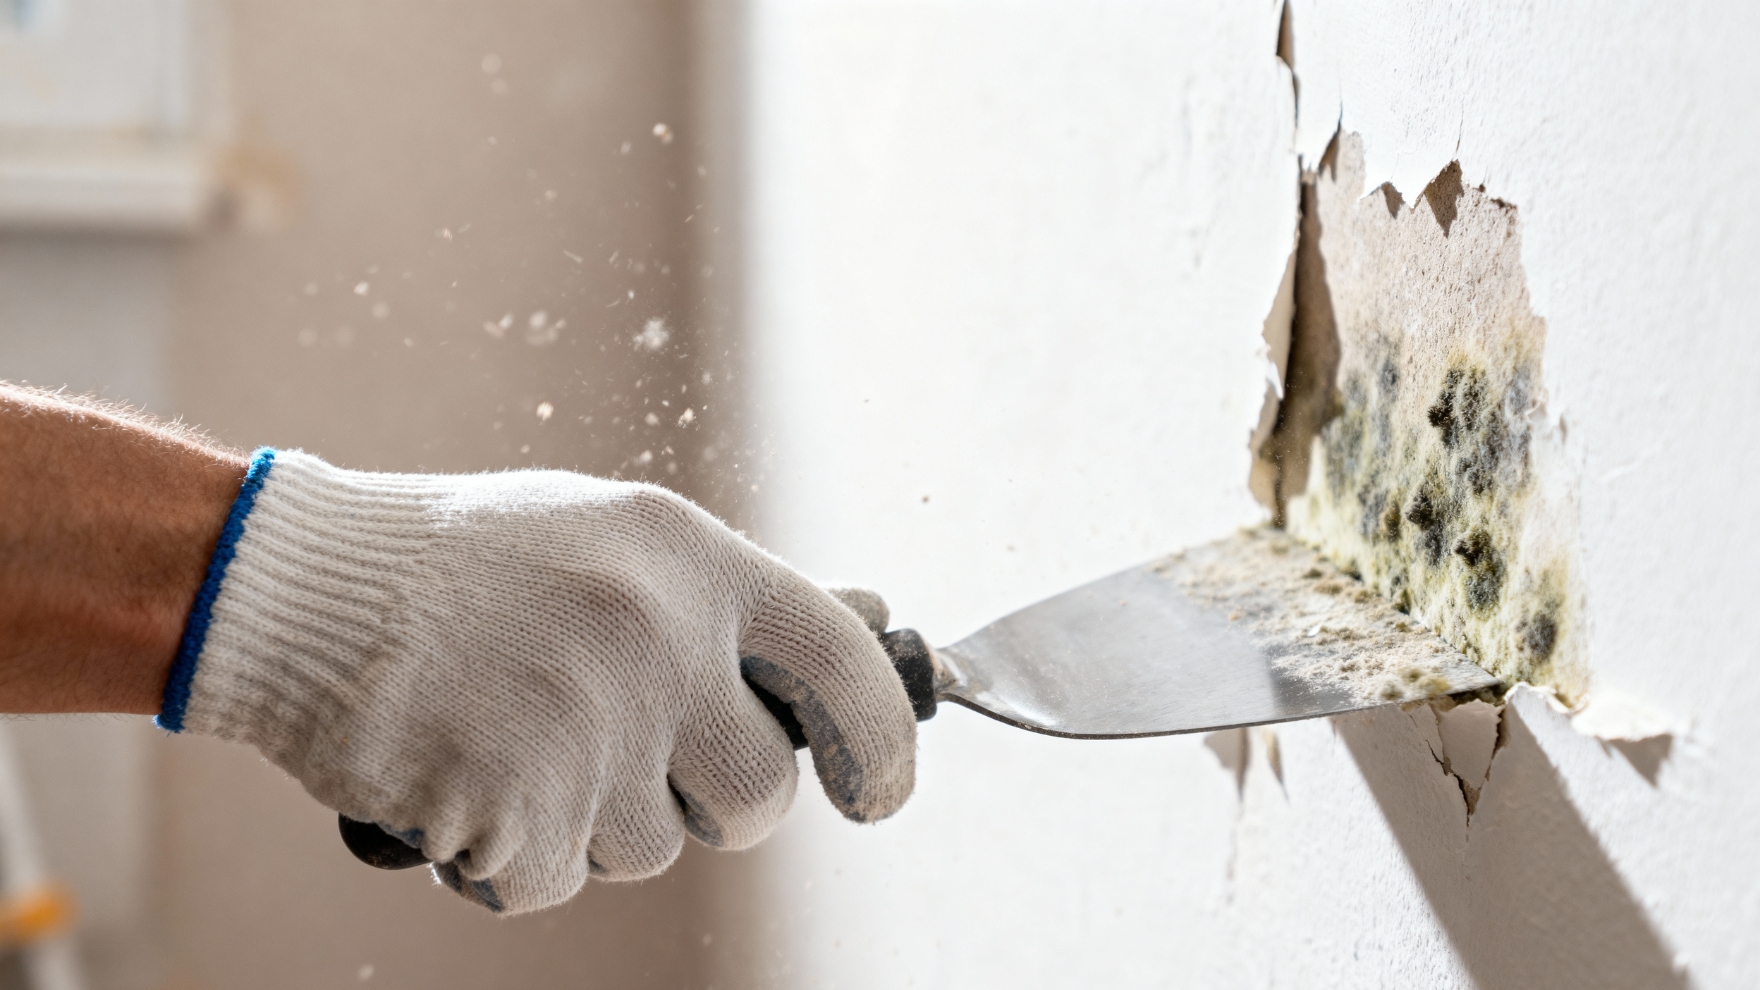
When your inspector tells you there is moisture inside a wall, your first move should be to clarify the scope and then bring in the right specialists. Practical advice to buyers in this situation suggests that after an inspector finds signs of mold and moisture inside the walls, the second step is to determine the source of the moisture, which may take professional examination from an architect, engineer or another inspector. That same guidance notes that once the source is identified and corrected, you should remove and replace materials that have gotten wet or moldy, rather than hoping they dry out on their own behind the wall.
Basements deserve special attention, because they combine hidden moisture with air quality concerns. Wet basement specialists advise that when there is a musty smell or visible mold in the basement, the first step is to look for leaks that can lead to moisture problems, and to check humidity with a hygrometer so you know if you are dealing with air that is at 60 percent or higher, which encourages mold growth. One guide on what to do when a home inspection reveals a wet basement stresses that When there is a musty smell or visible mold, you should not just deodorize, you should track down and fix the leak and then control humidity. If the issue is localized around a fixture, such as a toilet, you may also want a licensed plumber to investigate, as the Reddit thread where an inspector noted elevated moisture levels and the seller’s plumber found no obvious leak shows how tricky these cases can be.
Drying, repairs and long term prevention
Like Fix It Homestead’s content? Be sure to follow us.
Here’s more from us:
- I made Joanna Gaines’s Friendsgiving casserole and here is what I would keep
- Pump Shotguns That Jam the Moment You Actually Need Them
- The First 5 Things Guests Notice About Your Living Room at Christmas
- What Caliber Works Best for Groundhogs, Armadillos, and Other Digging Pests?
- Rifles worth keeping by the back door on any rural property
*This article was developed with AI-powered tools and has been carefully reviewed by our editors.