The attic detail that tells you the house has been patched repeatedly
The most revealing clue about a home’s history is rarely in the listing photos. It is in the attic, where patched sheathing, stained framing, and improvised fixes quietly record every leak and shortcut. If you learn to read that story, you can tell when a house has been repaired again and again, and whether those fixes were smart investments or warning signs that bigger problems are still overhead.
By focusing on one key detail, the underside of the roof deck, you can quickly see whether you are dealing with a roof that has been thoughtfully maintained or one that has been repeatedly bandaged. From there, other attic signals, from rusted nails to heavy tar around flashing, help you decide whether to negotiate harder, budget for major work, or walk away.
The attic clue that gives the game away
When you climb into an attic and see a patchwork of different wood panels, odd seams, and scattered new boards against older sheathing, you are looking at the clearest sign that the roof above has been opened and patched multiple times. Instead of a uniform field of plywood or planks, you might notice rectangular cutouts where sections were removed and replaced, or strips of fresh lumber sistered alongside older rafters. That irregular pattern is the attic detail that tells you the house has been patched repeatedly, often after leaks or localized failures that never made it into the sales brochure.
Those patches are not automatically a deal breaker, but they demand context. If the roof is already at or past the typical service life for its material, a quilt of repairs can indicate that you are buying the tail end of a long struggle to keep it going. Guidance on how to estimate roof age stresses that knowing when the current covering was installed is essential, because a roof over 20 years old is already in the replacement danger zone. When that aging roof is paired with a heavily patched deck, you can safely assume more work is coming.
Reading stains, rust, rot and mold in the attic structure
Once you spot patchwork sheathing, your next move is to study the surrounding framing for what one inspection guide calls Attic Structure issues. You are looking for stains, rust, rot and mold that radiate out from those repaired areas. Dark halos on rafters, rusty nail heads, and soft or crumbling wood show that water did not just pass through once, it lingered long enough to damage the structure. When you see multiple zones with this kind of distress, you are not just seeing isolated incidents, you are seeing a pattern of recurring moisture problems.
Professional checklists urge you to treat the wood structure and framing below the roof as a kind of damage map, since it should be free of excessive staining if leaks were rare and quickly fixed. One detailed breakdown of Attic Structure problems highlights that widespread staining and mold growth are red flags for chronic leaks or ventilation failures, not just a single storm event. If those defects cluster around patched sections of deck, you can reasonably infer that the house has been through several rounds of water intrusion and repair.
Water stains and discoloration that never quite go away
Even when the roof has been patched, water leaves a long memory on the underside of the deck. You should deliberately Check for Water Stains and Discoloration, scanning the sheathing for brown rings, dark streaks, or areas where the wood grain looks washed out. Once you are inside the attic, focus on the underside of the roof decking and the rafters, because those surfaces record every time water found a path through shingles, flashing, or fastener holes. If you see old stains alongside fresher, sharper outlines, that layered pattern suggests leaks that have recurred over time rather than a single incident.
Guides on identifying attic roof leaks explain that once you are in position, you should follow those stains back toward common entry points such as valleys, vents, and chimneys, since those are common spots for leaks that may have been patched from above. One step by step resource on how to inspect for leaks emphasizes that stains clustered around these features are a strong indicator of past problems. A separate explanation of how to Check for Water reinforces that even if the surface is now dry, the discoloration itself is evidence that water has been there before, and possibly more than once.
Dripping, moisture and the ceiling stains below
Attic patches rarely happen in isolation, they usually follow visible symptoms inside the living space. Water stains on your ceilings or walls are a classic example, and they often trace back to the same areas where you later find patched sheathing overhead. A single stain on drywall shows you have a leak, and guidance on interior warning signs notes that one leak often means more, especially if the roof is older. When you see multiple discolored spots on ceilings and walls below different parts of the roof, you can reasonably suspect that the attic has seen repeated wetting and repair.
Roofing specialists point out that Dripping or Moisture in the Attic is another key sign that problems are active, not just historical. One breakdown of common leak indicators lists Water Stains on Ceilings or Walls, Dripping, and Moisture in the attic as part of the same progression that, if ignored, leads to higher costs and long term damage. That same analysis of Water Stains underscores that when you see both interior staining and attic moisture, you are likely dealing with leaks that have persisted through more than one season. Another checklist on when a roof needs urgent replacement notes that Water stains are a red flag, and even a small mark can signal a larger problem above.
Flashing, tar and the telltale signs of quick fixes
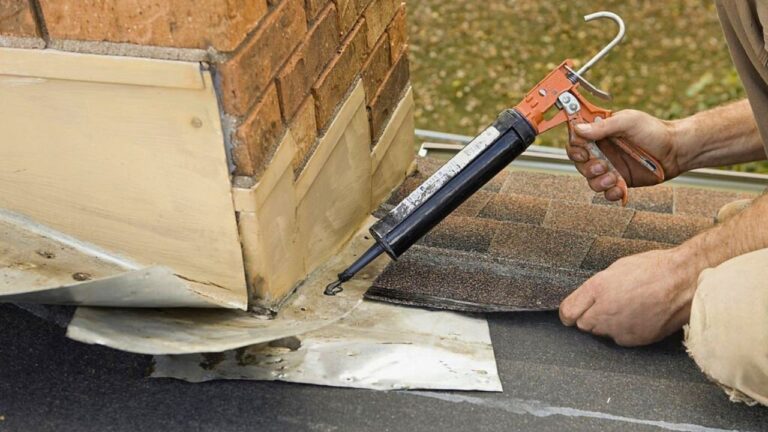
When you are trying to decide whether an attic has a history of repeated patching, the condition of the flashing is as revealing as the wood itself. Flashing seals roof penetrations like chimneys, vents, and skylights, and if it is rusted, cracked, or installed incorrectly, it becomes a chronic leak source that invites multiple repair attempts. In the attic, you may see staining or rot around these penetrations, while on the roof exterior you might notice new metal pieces mixed with older ones, or sealant smeared where metal should be doing the work. That combination suggests that instead of addressing the underlying design or installation flaw, someone kept chasing symptoms.
Roofing pros describe Faulty Flashing as one of the most common causes of attic leaks, precisely because it is easy to overlook and tempting to treat with quick patches. One detailed overview of Faulty Flashing notes that when this metal is compromised, water can follow it straight into the attic, leaving stains and damage that often lead to piecemeal repairs. A separate explanation of how Flashing should function makes clear that heavy use of tar or sealant is usually a sign of past leaks, not good craftsmanship. A home inspection video that walks through what the heck flashing is points out that when you see a lot of tar along the bottom edge of the flashing, it is normally related to a roof leak that someone tried to stop in a hurry, rather than a durable fix.
In that video, recorded in Feb, the inspector lingers on a section where tar has been slathered over metal instead of properly integrating the flashing with shingles. He notes that whenever you have a lot of tar, it is usually covering a problem rather than solving it. Watching that breakdown of Feb flashing issues, and then comparing it to your own attic and roof, helps you recognize when a house has been living with the same leak for years, patched again and again instead of properly reworked.
Why early detection and attic checks matter so much
If you are seeing a heavily patched attic, it often means the owners waited until leaks were obvious before acting. That is the opposite of how you want to manage a roof. The logic behind Early Warning Signs Your Roof Needs Repair is that you should respond to subtle clues, such as Shingles Showing Signs of curling or granule loss, Before It Starts Leaking into the attic. Once water is inside, every delay multiplies the damage and the number of patches you will eventually see overhead.
Roofing experts explain Why Early Detection Matters in blunt terms: catching problems before they reach the attic saves you from structural repairs, mold remediation, and emergency replacements. One guide to Early Warning Signs stresses that by the time you see stains in the attic, the roof has already failed at its primary job. Another resource on Shingles Showing Signs wear encourages you to schedule repairs when the damage is still limited to the exterior surface, so you never have to deal with the cascading costs that show up as a patchwork of interior fixes.
How to time and structure your own attic inspection
To avoid inheriting a history of hidden problems, you need a disciplined way to look at the attic, not just a quick peek with a phone flashlight. A proper attic inspection can help Identify early signs of roof leaks, Reveal ventilation issues that trap heat and moisture, and Detect structural red flags before they become crises. That means planning enough time to move safely through the space, checking every accessible bay, and correlating what you see overhead with what you know about the roof’s age and design.
Inspection guides recommend that you Pick the Right Time for this work, ideally during or just after a steady rain, when active leaks are easiest to spot. One detailed walkthrough on how to How to look for leaks notes that the best time to Check Your Attic for Roof Leaks is when water is actually moving, because you can trace drips back to their source. A more detailed version on how to Check Your Attic explains that you should start by scanning for obvious wet spots, then turn off your light briefly to look for daylight shining through nail holes or gaps. Another attic inspection guide that focuses on how to Identify problems and Reveal ventilation issues also reminds you to look for blocked vents or signs that insulation has been disturbed during past repairs.
Using interior investigations to cross check the story
Your attic findings become much more powerful when you cross check them against what you see inside the house. An Interior Investigation of the Attic Space is often described as the bridge between roof and living area, because it points out problems with attic ventilation, damaged wood, and past or present leaks that might not yet show on finished surfaces. When you see patched sheathing directly above a room with a suspiciously fresh paint job, for example, you have a strong hint that a ceiling stain was recently covered rather than fully resolved.
Practical guides for homeowners suggest that by combining an interior walkthrough with an attic inspection, you can spot problems early and talk to a contractor without getting hosed by surprise change orders. One widely shared tip sheet on how to Interior Investigation of recommends looking for subtle clues like uneven temperatures between rooms, faint musty odors, or small nail pops in drywall, all of which can align with what you see overhead. A more detailed attic inspection guide that aims to Det structural red flags also encourages you to note any sagging ceilings or cracked plaster that might correspond to areas where the roof deck has been repeatedly opened and reinforced.
Paper trails, permits and the real age of that patched roof
Turning attic evidence into negotiation leverage
Like Fix It Homestead’s content? Be sure to follow us.
Here’s more from us:
- I made Joanna Gaines’s Friendsgiving casserole and here is what I would keep
- Pump Shotguns That Jam the Moment You Actually Need Them
- The First 5 Things Guests Notice About Your Living Room at Christmas
- What Caliber Works Best for Groundhogs, Armadillos, and Other Digging Pests?
- Rifles worth keeping by the back door on any rural property
*This article was developed with AI-powered tools and has been carefully reviewed by our editors.