The ceiling fan replacement mistake that can fail inspection fast
Replacing a ceiling fan looks like a simple swap: old fixture down, new fan up. In reality, one hidden mistake can cause an inspector to fail your project in seconds and, worse, put everyone in the room at risk. The most common culprit is not the fan itself, but what you bolt it to and how you wire and mount it behind the drywall.
If you treat a heavy, moving fan like a lightweight light fixture, you invite wobble, loosening screws, and potentially a catastrophic fall. By understanding what inspectors look for, and how the electrical code treats ceiling fans differently from other fixtures, you can avoid an expensive red tag and keep your upgrade safe for the long term.
The hidden weak link inspectors spot first
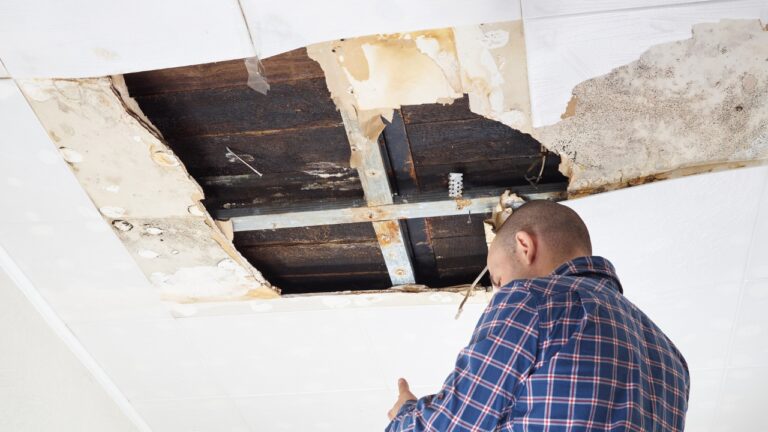
The fastest way to fail inspection is to hang a new fan from an electrical box that was never designed to hold a moving load. Many older homes have simple plastic or thin metal boxes that were only intended to support a light, not a spinning motor and blades. When you bolt a fan to that kind of box, the weight and vibration can crack the box, loosen screws, and eventually let the fan work itself free, which is exactly the kind of defect inspectors are trained to flag as soon as they look up.
Code language treats this as a structural issue, not a cosmetic one. The rules for Boxes at Ceiling, Suspended, Paddle, Fan Outlets make clear that the Outlet must be listed and marked for fan support, and that ordinary boxes should not carry that load. Inspectors also know from guidance on Common Fan Defects that Fans which are not properly supported can loosen and potentially fall, so they will not hesitate to fail an installation that relies on a non rated box, even if the fan appears to run smoothly during a quick test.
What the electrical code actually requires
When you replace a light with a fan, you are stepping into a different part of the electrical code, and inspectors know that by heart. Section 314.27(C) spells out that Outlet boxes at ceiling suspended paddle fan locations must be listed for fan support and able to carry the weight and dynamic load of the fan. It also addresses situations where a box is installed in habitable rooms of dwellings and could reasonably be used for a fan in the future, which is why inspectors are so strict about seeing the correct markings on the box itself.
Those code requirements are echoed in practical terms in the detailed rules for Ceiling Suspended Paddle Fan Outlets, which state that boxes not listed for fan support should not support fans and that the box must be marked with the maximum weight it can hold. If you hang a 35 pound fan from a box labeled for 35 pounds of static load but not for a moving fan, an inspector can still call it out, because the code distinguishes between a stationary fixture and a rotating one. That is why simply checking the weight rating is not enough; you must confirm that the box is specifically fan rated.
How DIY swaps go wrong before the fan is even unpacked
Many homeowners get into trouble before they ever open the new box, by assuming that any existing ceiling fixture is a green light for a fan. In reality, you need to verify the structure above the drywall, not just the visible hardware. Professional guides on how to install a ceiling fan emphasize that you must confirm the existing electrical box is fan rated and that the mounting hardware is designed for a fan, not just a light. If you skip that step and simply reuse what is there, you have already made the mistake that can fail inspection in seconds.
Even when you do plan ahead, it is easy to underestimate the forces involved. Instructions that walk you through the project explain that Before you begin, you should check the joists for any damage and use a brace or mounting system that helps support the fan’s weight. If you are replacing a small flush mount light in the center of a bedroom, that often means cutting a slightly larger opening, installing a fan brace between joists, and then adding a new fan rated box, all of which inspectors expect to see when they look above the canopy.
The structural mistake that makes fans fall
Once you understand the code, the structural mistake becomes obvious: you cannot treat a fan like a static decoration. The motor, blades, and any attached light kit create a constantly changing load that transfers vibration into the box, screws, and framing. Over time, that movement can loosen connections that looked solid on day one. Inspectors are trained to look for signs of this risk, such as fans that wobble, boxes that flex when the fan is pushed gently, or mounting brackets that are not fully seated against the framing.
Guidance on Installation or Mounting Problems notes that if the mounting hardware is not properly secured, a fan can slip from its secure position and even fall, especially after events like storms that shake the structure. That risk is exactly why inspectors take a hard line on the underlying support, not just the visible trim. They know from real world failures that a fan that is only marginally supported might survive a quick test on inspection day, then work loose months later when someone runs it on high speed overnight.
Wiring errors that trigger red tags
Even if your fan is structurally sound, sloppy wiring can still derail the inspection. Common DIY errors include mixing up switched and unswitched conductors, leaving splices loose, or cramming too many wires into a small box without proper connectors. Electricians who specialize in fan work stress that Ceiling fans must be installed with wiring sized correctly for the circuit, with secure terminations and appropriate protection, especially in damp or wet locations like covered porches where additional ratings are required.
Detailed breakdowns of DIY mistakes explain that Mistakes often happen if wire connections are not properly secured, which can lead to intermittent operation, damage to your fan and lights, or in extreme cases an increased risk of an electrical fire over time. Inspectors will remove the canopy if they suspect problems, looking for exposed copper, missing wire nuts, or evidence that aluminum conductors were tied to copper without the special connectors that are required for that combination.
Clearance, blade height, and other inspection tripwires
Beyond the box and wiring, inspectors also look at how the fan sits in the room. A fan that is too low is not just inconvenient, it is a safety violation. Home inspection guidance notes that Fan blades are too low if they are less than 7 feet above the floor, and that a fan installed on a 7 foot ceiling is a problem because it cannot meet that standard. If you install a fan with a long downrod in a room with a modest ceiling height, an inspector can fail it even if everything behind the canopy is perfect.
Room geometry matters as well. Installers warn that Measuring the Ceiling is a common error when you are working on a vaulted or angled ceiling, which can leave blades too close to the drywall or even striking it at high speed. Inspectors will check that the fan has adequate clearance from sloped surfaces and that the mounting kit is rated for the angle you are using. If you improvised with a standard bracket on a steep slope, you can expect a fail notice and a requirement to reinstall with the correct hardware.
Real world consequences: claims, coverage, and liability
Failing inspection is frustrating, but the bigger risk is what happens if a poorly supported fan causes damage or injury later. A real world example shared in a homeowner group described how a family who bought our house 1st of the year put in a claim for ceiling fans with exposed wire in a child’s and their own bedroom, which was identified as a code issue. That kind of defect can trigger not only repair costs but also questions about who is responsible, from the previous owner to the contractor who did the work.
Professional electricians who see these problems every week point out that what looks like a quick DIY job can become expensive once you factor in the cost of correcting aluminum wiring that requires special connectors, replacing undersized boxes, and dealing with a damaged motor. Inspectors are aware of these downstream risks, which is why they treat exposed conductors, non rated boxes, and improvised mounting hardware as serious defects rather than minor punch list items.
Why instructions and rated hardware are not optional
One of the quieter reasons fans fail inspection is that installers ignore the manufacturer’s instructions, especially when it comes to the mounting system. Retailers and fan specialists warn that Mistake #5, Skipping the Instructions, can seriously harm the motor and lead to noisy or unstable operation. Inspectors know that the listing of the fan and its mounting kit assumes those instructions were followed, so if they see missing screws, substituted brackets, or a canopy that does not sit flush, they have reason to question the entire installation.
Video walkthroughs aimed at homeowners reinforce the same point from a different angle. In one tutorial, Oct footage shows a step by step process for correcting wobbling fans and installer errors, including tightening all factory supplied fasteners and balancing the blades. Another video features Mike Wilson of Any Hour Services demonstrating how to install a ceiling fan rated box, emphasizing that you must use hardware specifically designed for the load. Inspectors are effectively looking for the same hallmarks of a professional job: correct box, correct bracket, and all the parts the manufacturer provided actually in use.
How to pass inspection the first time
If you want your fan replacement to sail through inspection, you need to think like the person holding the checklist. Start by confirming that the existing box is fan rated, marked for the appropriate weight, and secured to framing or a listed brace. If it is not, replace it with a properly listed box and support system before you even assemble the fan. Then verify that your wiring is correct for the circuit, that all splices are tight and enclosed, and that any special conditions, such as aluminum conductors or damp locations, are handled with the connectors and ratings that the code requires.
Next, pay attention to the visible details inspectors use as quick tells. Make sure the blades are at least 7 feet above the floor, that the fan is centered and has adequate clearance from walls and sloped ceilings, and that it runs smoothly on all speeds without wobble. Use the manufacturer’s instructions as a checklist, not an afterthought, and do not hesitate to bring in a licensed electrician if you encounter structural surprises in the ceiling. By treating the fan as a structural and electrical system, rather than a decorative accessory, you avoid the ceiling fan replacement mistake that can fail inspection fast and instead end up with a quiet, safe fixture that will stay put for years.
Like Fix It Homestead’s content? Be sure to follow us.
Here’s more from us:
- I made Joanna Gaines’s Friendsgiving casserole and here is what I would keep
- Pump Shotguns That Jam the Moment You Actually Need Them
- The First 5 Things Guests Notice About Your Living Room at Christmas
- What Caliber Works Best for Groundhogs, Armadillos, and Other Digging Pests?
- Rifles worth keeping by the back door on any rural property
*This article was developed with AI-powered tools and has been carefully reviewed by our editors.