The drywall texture trick that hides uneven repairs
When a drywall patch flashes through fresh paint, it is rarely the repair itself that gives you away, it is the texture. The fastest way to make a fix disappear is to stop chasing a perfectly flat surface and instead use a controlled texture that mimics the surrounding wall so your eye reads one continuous plane.
The “drywall texture trick” is really a set of small, repeatable moves that let you soften edges, scatter light, and blend new work into old surfaces. By choosing the right pattern, dialing in the mud, and finishing with smart priming and paint, you can hide uneven repairs so effectively that even a critical guest will struggle to find them.
Why texture hides flaws better than flat walls
You notice a patch because light hits it differently, not because the defect is huge. A flat, smooth wall acts like a mirror for raking light, so even a shallow ridge or dip from a repair can cast a sharp shadow. When you add a subtle texture, you break up that reflection into thousands of tiny highlights and lowlights, which makes minor unevenness blend into visual “noise” instead of standing out as a single defect.
That is why so many builders rely on textured finishes to mask imperfect drywall work and create a more forgiving surface. Guides on different wall textures explain that patterns like orange peel and popcorn are specifically valued for how they diffuse light and even help with sound, reducing noise between floors and rooms. You are using the same principle on a smaller scale when you texture over a repair: instead of trying to erase every imperfection, you disguise it inside a consistent pattern that your eye accepts as intentional.
Reading your existing wall: orange peel, knockdown, or something else
Before you reach for joint compound, you need to decode what is already on your wall. Many modern homes use an orange peel texture, named because the surface looks like the dimpled skin of an orange, with small, rounded bumps that are fairly uniform. Other spaces lean on heavier patterns such as popcorn, which creates a more pronounced, acoustic-style finish that can soften sound and visually hide larger waves in the drywall.
Take a close look in natural light and run your fingers across the surface to decide whether you are dealing with orange peel, a heavier popcorn, or a flatter pattern. Resources that walk through texture methods point out that each style, from soft knockdown to bold swirl patterns on the wall, is chosen for a reason, usually a mix of aesthetics and flaw-hiding power. Matching that existing choice is the foundation of making your repair disappear, because even perfect mud work will stand out if the pattern is wrong.
The core trick: feathered knockdown over your repair
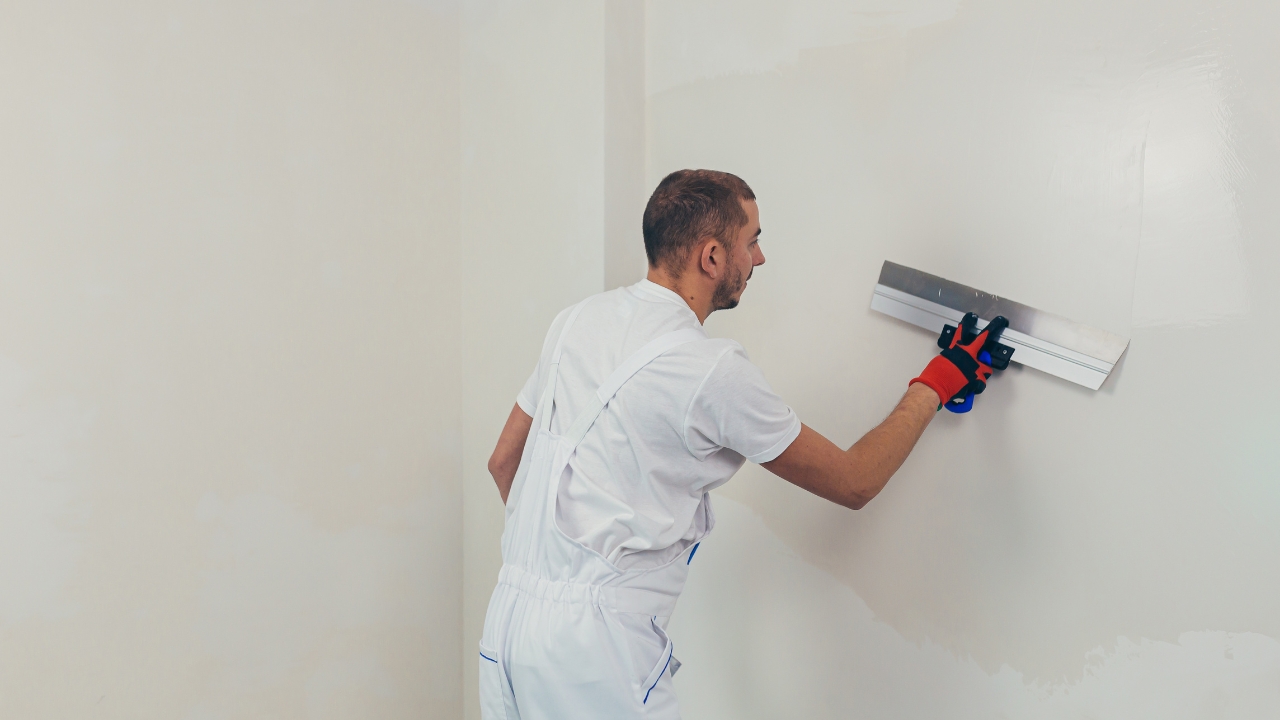
The most reliable way to hide an uneven patch is to apply a light knockdown texture that extends beyond the repair and then gently flatten it so it blends into the surrounding field. You start by spraying or rolling a thin, splattered coat of thinned joint compound over the patched area, letting the droplets build a fine, random pattern. After a short set time, you drag a wide knife or trowel over the surface with almost no pressure, just enough to “knock down” the peaks into soft, flattened islands.
When you do this correctly, the new knockdown pattern bridges the transition between old and new drywall, so your eye reads one continuous surface instead of a hard edge around the repair. Detailed how‑to guidance on knockdown texture notes that this finish is specifically prized because it can hide imperfections and add subtle dimension without feeling heavy or dated. You are essentially using that same soft, mottled look as camouflage, stretching it several inches past the patch so the transition is invisible once painted.
Dialing in mud consistency and tools so the pattern matches
Texture only hides flaws if the scale and density of the pattern match what is already on the wall, which comes down to how you mix your mud and what you use to apply it. If your compound is too thick, the splatter will form big, isolated blobs that look clumsy next to a fine orange peel. Too thin and it will run or level out before you can knock it down, leaving a hazy film instead of distinct texture. You want a consistency similar to pancake batter for most spray or roll‑on textures, then you can adjust slightly thicker or thinner after a test patch.
Experienced finishers often tweak their mix with small tricks to improve workability. In one discussion among pros, a contributor in a group thread that begins with “It’s not necessary” explains that a bit of liquid soap in drywall mud can help reduce tiny air bubbles, sometimes called fisheyes, especially over previously painted surfaces, although they stress that it is not required. Whether you use additives or not, your main focus should be consistency and delivery: match the nozzle or roller type to your existing texture, and keep your spray distance and pressure steady so the droplets land in a pattern that mirrors the original wall.
Borrowing from orange peel and skip trowel techniques
If your home has orange peel, you can adapt that pattern directly over your repair. A light splatter of thinned mud, applied with a small hopper gun or aerosol texture can, will give you the characteristic dimples that define this finish. Once it dries, you can leave it as is or very lightly sand the highest points so it blends into the surrounding field without a noticeable ridge. Tutorials on orange peel repair emphasize letting the texture get bone dry before you prime, and they recommend a light coat of an oil based KILZ spray to lock everything in before paint.
For walls with a more artisanal look, a skip trowel pattern can be a powerful ally. This technique uses a curved knife or trowel to drag a thin layer of mud across the surface so it “skips,” leaving broken, overlapping patches of compound that create a soft, Mediterranean feel. Guides on skip trowel texture explain that you achieve the effect by holding the tool at a shallow angle and letting it miss spots as you move, which naturally forms a skipped pattern down the wall. When you echo that same motion over and around your repair, the eye reads the new work as part of the original hand‑applied finish.
Learning from the pros: small habits that make repairs vanish
Professional finishers rarely rely on a single pass to hide a repair, they build up a sequence of small, controlled steps. One common habit is to prefill deeper holes or seams with a setting compound, then skim a wider area with lightweight mud so the transition from patch to existing wall is gradual rather than abrupt. In a detailed walkthrough of drywall repair, you can see how a pro uses a product like Vanco joint compound, then feathers each coat several inches farther out, which keeps the final surface from telegraphing the original damage.
Another pro move is to treat texture as a separate, deliberate step instead of an afterthought. Short tutorials on matching knockdown show how even a small hole repair gets a dedicated texture pass, often using a simple plastic bag or specialty sponge to dab on splatter before knocking it down. By isolating that stage, you give yourself room to adjust pattern density, scrape back heavy spots, and blend edges without disturbing the underlying patch, which is exactly how you keep the repair from flashing through once the wall is painted.
Controlling spray textures, from cans to compressors
If you are using a spray can or hopper gun, the real trick is restraint. You want just enough material to recreate the existing pattern, not a thick, wet coat that will sag or form drips. One step‑by‑step video on textured drywall repair stresses that it only takes a quick spray to cover a patch and that overusing a can can ruin the texture and even make the product unusable later. Short bursts, with the nozzle kept moving, let you build up the pattern gradually and stop as soon as it matches the surrounding wall.
For hand‑applied textures, you have even more control. Techniques like skip trowel are done entirely with a pan and trowel, which means you can adjust pressure, angle, and mud thickness on the fly. A demonstration that encourages you that you can easily do shows how each person’s motion creates a slightly custom look, which is actually an advantage when you are blending into an existing, hand‑done finish. The key is to practice on scrap or a hidden section first, then replicate the same rhythm and tool angle over your repair so the new pattern feels like a natural continuation of the old.
Primer, sheen, and why paint can ruin a perfect texture match
Even a flawless texture match can be betrayed by poor priming or the wrong paint sheen. Fresh joint compound is far more porous than painted drywall, so if you skip primer, the patched area will absorb paint differently and show up as a dull, flat spot or a halo around the repair. One manufacturer response that opens with “Hello Mel and thanks for your review” underscores that new drywall or repairs must be properly primed and allowed to dry or cure fully before you install finishes like peel and stick flooring, and the same logic applies before you paint a textured wall.
Professional painters are blunt about this. One guide compares skipping primer to skipping sunscreen, you might get away with it once, but the damage accumulates, and they call priming non‑negotiable before paint or wallpaper. For repairs, that means sealing the textured area with a quality primer, ideally the same type used on the rest of the wall, and then using a matching sheen, such as eggshell over eggshell. Short clips on flawless drywall repair even highlight how eggshell paint can change how plaster dries and looks, which is another reminder that your paint system is part of the disguise, not just the final color.
Blending edges and managing light so the repair disappears
The final part of the trick is managing how the repair meets the rest of the wall and how light hits that area. You want your texture and paint to feather out well beyond the actual patch, so there is no visible ring or sharp line where new work stops. Homeowners swapping tips on uniform texture note that otherwise it seemed you could see the texture as it stuck out more than the natural surface, which is exactly what happens when you confine your repair to a tight box instead of blending it into a larger area.
Light is just as important as mud and paint. If a wall gets strong side lighting from a window or a row of recessed fixtures, even a small bump can cast a long shadow. That is where softer textures like knockdown texture or a gentle orange peel can help, because they scatter that light into many small reflections instead of one harsh line. When you combine that with careful feathering, solid priming, and a matching sheen, the unevenness that once caught your eye becomes just another part of the wall’s character, effectively hidden in plain sight.
Like Fix It Homestead’s content? Be sure to follow us.
Here’s more from us:
- I made Joanna Gaines’s Friendsgiving casserole and here is what I would keep
- Pump Shotguns That Jam the Moment You Actually Need Them
- The First 5 Things Guests Notice About Your Living Room at Christmas
- What Caliber Works Best for Groundhogs, Armadillos, and Other Digging Pests?
- Rifles worth keeping by the back door on any rural property
*This article was developed with AI-powered tools and has been carefully reviewed by our editors.