The fastest way to document your home for a claim, and what people forget to photograph
When disaster hits, the clock starts ticking on your insurance claim long before you feel ready to list every damaged item in your home. The fastest way to protect yourself is to walk through your space with a camera now, while everything is intact, and capture proof that will stand up to scrutiny later. A smart photo and video routine can turn a chaotic, memory‑driven claim into a straightforward reimbursement, especially if you also record the details people routinely forget to photograph.
Instead of trying to remember every book, appliance, and pair of shoes after a fire or burglary, you can lean on a visual record that shows what you owned and what it was worth. By pairing quick documentation techniques with a short checklist of easy‑to‑miss shots, you give your future self a clear roadmap at the exact moment you are most likely to feel overwhelmed.
Why a visual home inventory is your fastest claim tool
The core reason to document your home now is simple: you will not think clearly after a loss. Guidance on What Is a Home Inventory? stresses that after a fire, break‑in, or storm damage, you are likely to be tired, overwhelmed, and possibly displaced, which makes reconstructing a list of belongings from memory extremely difficult. A visual inventory, built while life is calm, becomes a substitute memory that you can hand to an adjuster instead of trying to recall every item under pressure.
Insurers and regulators consistently recommend that you document all the personal property in your residence, because the more detailed your inventory, the more useful it will be if you ever need to file a claim. The California Department of Insurance explicitly urges residents to document all the personal property in their homes and use a structured guide to do it. When you combine that level of detail with photos and video, you give your insurer a clear, verifiable record that can speed up processing and reduce disputes over what you owned.
The quickest way to capture everything: one continuous walkthrough
The fastest method to get a baseline record is a single, continuous video walkthrough of your home. Instead of stopping to photograph each item, you move room by room, slowly panning from floor to ceiling and narrating what you see. Photo‑organizing experts describe this as The Fast, Simple Way to start: Use Your Smartphone Camera, open the video mode, and Then walk through your space, calling out brands, models, and purchase dates as you go. You can complete an entire home in under an hour, which is far quicker than building a written list from scratch.
Video also solves a problem that becomes obvious only after a loss: you own far more than you think. In one tutorial on how to create a home inventory with photos and videos, the presenter jokes about trying to list 300,000 items for insurance and how impossible that feels when you are stressed. A continuous walkthrough captures the big items and the background clutter in a single pass, so even if you never get around to tagging every object, you still have proof that those shelves of books, racks of clothes, and stacks of dishes existed.
Turning a fast video into a usable claim record
A raw video is a powerful start, but you make it truly claim‑ready by layering in a few key details. As you film, pause briefly on high‑value items and zoom in on labels, logos, and serial numbers, then say out loud where and roughly when you bought them. Claims specialists recommend that you include close‑ups of serial numbers and model information, because those details help confirm value and replacement cost. When you later scrub through the footage, you can pause on those frames and pull out the exact data your insurer will ask for.
Once the video is saved, you can turn it into a simple index without re‑shooting anything. One approach is to follow structured advice that tells you to Follow a series of steps: Start by creating folders for each room, then capture still photos from your video and drop them into the right folder, adding a short note or spreadsheet line for big‑ticket items. You do not need to catalog every spoon, but if you can quickly list your television, laptop, sofa, and major appliances with approximate values, you have already made your adjuster’s job much easier.
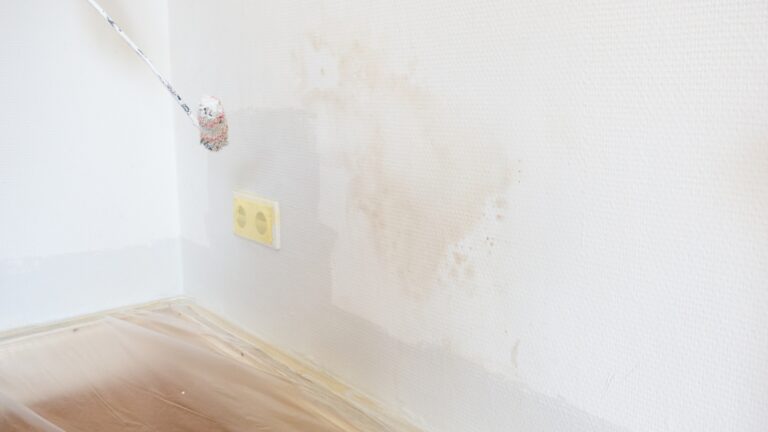
What people always forget to photograph
When you are rushing through a walkthrough, it is easy to focus on obvious valuables and skip the less glamorous details that can make or break a claim. One of the most common blind spots is the condition of walls, ceilings, and floors before anything goes wrong. Public adjusters warn that people often fail to capture before‑and‑after photos that show their property was intact shortly before it was damaged, which can make it harder to prove that a storm or leak, rather than long‑term neglect, caused the problem.
Another category people overlook is the “invisible” value built into closets, cabinets, and storage spaces. A quick sweep of your pantry, linen closet, and garage shelves can add up to thousands of dollars in clothing, tools, and supplies that you would struggle to itemize from memory. Consumer guides on home inventories emphasize that one of the biggest mistakes is undercounting everyday belongings while focusing only on a handful of “valuable items.” Your camera can correct that bias in seconds if you deliberately open every door and drawer as you film.
Room‑by‑room shortcuts that keep you moving
The fastest documentation routines are systematic rather than perfect. Instead of bouncing randomly around the house, you pick a starting point and move in a consistent pattern, such as clockwise around each room. Insurance checklists suggest that you Decide on a room‑by‑room plan, then tackle one space at a time so the project feels manageable. You can start with high‑value areas like the living room and primary bedroom, then work your way to secondary spaces when you have time.
Within each room, you can use a simple three‑pass method to stay efficient. First, take a wide shot of the entire space, then walk closer for mid‑range shots of furniture groupings, and finally capture close‑ups of labels and serial numbers on electronics and appliances. Some guides recommend that you label pictures of rooms and note when you brought big items into your home, which you can do verbally while filming or later in a simple text file. This structure keeps you moving while still giving you enough detail to reconstruct a list later.
Using apps and tech so you are not buried in files
Once you start taking photos and videos, the next challenge is keeping them organized and accessible if you ever need them. Modern tools make this far easier than juggling loose files on your phone. Some insurers encourage you to Use technology to create a property insurance inventory list, because digital records can be stored in the cloud, shared with your agent, and updated over time. Even a simple habit of backing up your home‑inventory folder to a service like Google Drive or iCloud can ensure you still have proof if your phone is lost in the same event that damages your home.
If you want more structure, dedicated inventory apps can turn your photos into a searchable database. Reviews of The Best Home Inventory App for iPhone and iPad explain that The Best Home Inventory App for Apple devices lets you attach images, values, and locations to each item so you can quickly find what you own but cannot easily find in a crisis. Other roundups highlight five favorite home inventory apps that help you track “anything and everything” and even support cloud or Google Drive backup and image upload, noting that As you should be able to, you can sync your data across devices so it is available when you need it.
Apps that turn photos into a living home record
Some tools go beyond simple lists and treat your home like a dynamic system you can manage over time. One Editors’ Choice app, Under My Roof, is described as a go‑to option for organizing a home, whether you are inventorying belongings, tracking maintenance, or planning moves. Because it encourages you to attach documents, purchase dates, and warranty information to each item, you may find yourself documenting everything, not just what you fear might be stolen or destroyed.
There are also tools built specifically for insurance documentation. The NAIC Home Inventory app, available on The NAIC Home Inventory app for Android and iOS, was developed by the National Association of Insurance Commissioners to help you store photos, descriptions, and values in one place. Because it is designed around claim needs, it nudges you to capture the kinds of details adjusters look for, and it lets you update your inventory at any time as you buy or sell items.
How to shoot photos that actually help your claim
Not all images are equally useful when you are trying to prove a loss. Claims professionals stress that photos are essential because they provide objective evidence that can protect you from any suspicion of embellishment. One guide titled Why Photos Are Essential for Insurance Claims explains that whether you are dealing with a storm‑damaged roof or a stolen bike, clear images of the item and its condition before and after the event can speed up approval and reduce back‑and‑forth with your insurer.
Quality matters as much as quantity. Public adjusters warn about Common Photo Mistakes That Hurt Property Damage Claims, including Taking Blurry, Unclear Photos that make it hard to see damage, skipping context shots that show where an item sits in the room, and failing to capture hidden issues like water intrusion behind baseboards. To avoid those pitfalls, take a mix of wide, medium, and close‑up shots, check that your images are in focus, and use natural light or a flashlight to reveal details in dark corners or attics.
Keeping your inventory current without burning out
The fastest way to document your home is the one you will actually maintain, so your system has to be sustainable. Instead of treating inventory as a one‑time marathon, you can build it into your normal routines. Some consumer guides suggest that you start with a quick pass, then add detail over time, echoing the advice that Taking a household inventory may feel overwhelming, but you can simplify the process by breaking it into smaller steps. You might schedule a 20‑minute session each month to update one room or add new purchases.
Insurance experts also recommend that you revisit your inventory after major life changes, such as a renovation, a move, or a big purchase like a new television or set of tools. A detailed guide on how to make a home inventory for insurance notes that As you prepare your inventory, you are really creating a roadmap for yourself in the face of a terrible disaster, so it is worth a few minutes now and then to keep it accurate. If you treat your photos and videos as a living document rather than a one‑off project, you will always be only a few clicks away from the evidence you need when a claim suddenly becomes real.
Like Fix It Homestead’s content? Be sure to follow us.
Here’s more from us:
- I made Joanna Gaines’s Friendsgiving casserole and here is what I would keep
- Pump Shotguns That Jam the Moment You Actually Need Them
- The First 5 Things Guests Notice About Your Living Room at Christmas
- What Caliber Works Best for Groundhogs, Armadillos, and Other Digging Pests?
- Rifles worth keeping by the back door on any rural property
*This article was developed with AI-powered tools and has been carefully reviewed by our editors.